Windows Server can be used by IT administrators to rollout Microsoft Software Installed (MSI) packages through Active Directory to computers and users using two separate methods:
| ■ | Publishing Software |
Publish a program distribution to users. When the user logs in to the computer, the published program is displayed in the Add/Remove Programs dialog box, and it can be installed from there by the user or network administrator.
For Published installations, systems will get the update to the Group Policy and advertise the MSI in the Add/Remove Programs dialog box for users to install. Updates to a Group Policy can take up to 30 to 60 minutes, depending on the size of the Active Directory organization and complexity.
| ■ | Assigning Software |
Assign a program distribution to users or computers. If the program is assigned to a user, it is installed when the user logs in to the computer. When the user first runs the program, the installation is finalized.
If the program is assigned to a computer, it is installed when the computer starts and is available to all users that log in to the computer. When a user first runs the program, the installation is finalized.
For Assigned installations, systems affected will get the update to the Group Policy and prepare for the MSI package installation upon the next restart.
Before deployment, create a shared network folder containing the MSI package that is to be distributed. Set permissions on the share to allow everyone necessary read access to the distribution package.
To deploy an MSI package:
| 1. | Log in as a Domain Administrator and open the Group Policy Management Console. |
The Group Policy Management Console can be installed on Windows Server 2003 or Windows XP Service Pack 1, and is available for download from the Microsoft website.
| 2. | Navigate to the Active Directory container (Domain or Organizational unit) of the users or computers targeted for MSI package deployment. |
| 3. | Right-click on the container and select Create and Link a GPO here... |
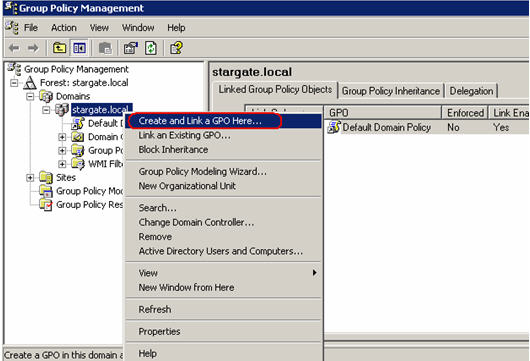
| 4. | Type in the name of the new Group Policy Object (GPO). For example, FaxPress Plus Client Installation. |

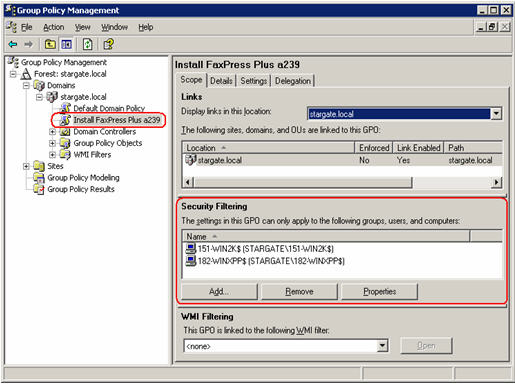
| 5. | Click on the new GPO and remove the default entry Authenticated Users in the Security Filtering section. Add the desired users, groups, and/or computers. |
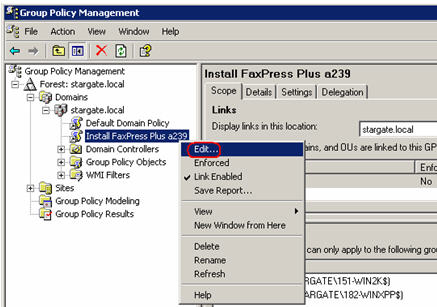
| 6. | Open the Group Policy Management Editor by right-clicking the Group Policy Object and selecting Edit... |
| 7. | In the Group Policy Object Editor, select either the Computer Configuration or User Configuration node according to target as configured in Security Filtering for this Group Policy Object. |
| 8. | Click and expand Software Settings. |
| 9. | Right-click Software Installation, then select New>Package... |
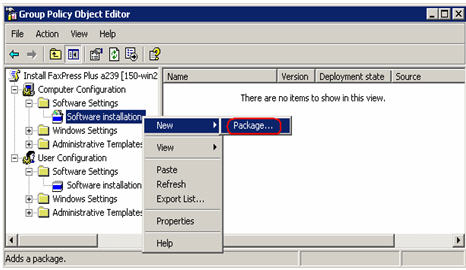
| 10. | Verify that the Source column shows a valid UNC path to the MSI package. |

| 11. | MSI installation is now ready for deployment. User workstations will deploy based on whether an Assigned or Published MSI installation was selected. To force a system to immediately obtain the update from the Group Policy, open a Command Prompt window and type gpupdate /force on Windows XP/2003 or secedit /refreshpolicy on Windows 2000, and restart the system. Upon restart, the updated workstations shall display the following, which confirms the update is taking place. |

Upgrading a Previous MSI Package
For Published installations, systems will get the update to the Group Policy and advertise the MSI in the Add/Remove Programs dialog box for users to install. Updates to a Group Policy can take up to 30 to 60 minutes, depending on the size of the Active Directory organization and complexity.
For Assigned installations, systems affected will get the update to the Group Policy and prepare for the MSI package installation upon the next restart.
| 1. | Open the Group Policy Object Editor by right-clicking on the Group Policy Object name in the Group Policy Management Console and selecting Edit… |
| 2. | Select either the Computer Configuration or User Configuration node according to target as configured in Security Filtering for the Group Policy Object. |
| 3. | Click and expand Software Settings. |
| 4. | Right-click on Software installation, select New, and then Package… |
| 5. | Select the Advanced method in the Deploy Software dialog and press OK. |
| 6. | Switch to the Upgrades tab and click on Add. |
| 7. | Select a specific GPO: option and use the Browse… to navigate to the current Group Policy Object. |
| 8. | For example, if the previous installation was Castelle FaxPress Plus 4.1.239, that package would be selected as the package to upgrade to Castelle FaxPress Plus 4.1.240 or higher. |
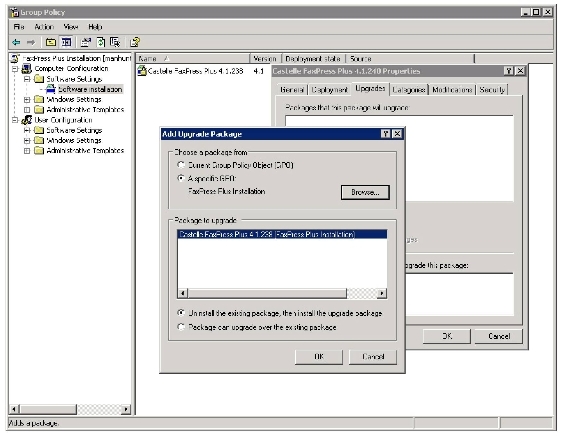
| 9. | Click OK on the Add Upgrade Package dialog box and again on the Properties dialog box for this new package. |
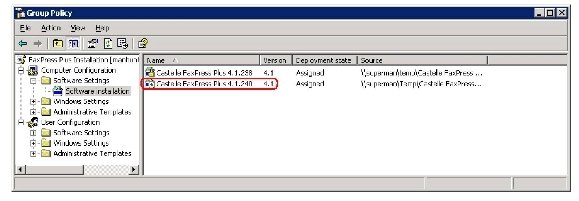
| 10. | MSI installation is ready for deployment. User workstations will deploy based on whether an Assigned or Published MSI installation was chosen. To force a system to immediately obtain the update from the Group Policy, open the Command Prompt and type gpupdate /force on Windows XP/2003 or secedit /refreshpolicy on Windows 2000, and restart the system. |
| 11. | As the system restarts, the previous installation of the MSI package will be removed and the new MSI package will be installed. The progress, as shown below, is displayed in the Startup progress dialog box. |

|
FaxPress Enterprise & Enterprise Redundant WebHelp
Last Updated: 11/1/2007
E-mail this page |
Castelle 855 Jarvis Drive, Suite 100 Morgan Hill, CA 95037 Toll-free 800.289.7555 Tel 408.852.8000 Fax 408.852.8100 |