If you know how to use Word’s MailMerge, using FaxMerge is easy. If you don't already know how to Mail Merge, use the Word wizard to learn how. The steps involved in using FaxMerge are:
| 1. | Creating a data source that includes recipient information (i.e., fax numbers). |
| 2. | Using MailMerge to create a Main document. |
| 3. | Attaching a data source to your MailMerge document. |
| 4. | Inserting the fields into the Main document. |
| 5. | Faxing merged documents. |
MS-Word uses the term Main document to describe what can be called a template. This is the document that is merged with a database or file to create multiple, personalized documents or faxes.
Merged documents are faxed without a cover page. To include a cover page, set up the first page of the document to be the cover page.
To create a Main document, use the Mail Merge function in Word.
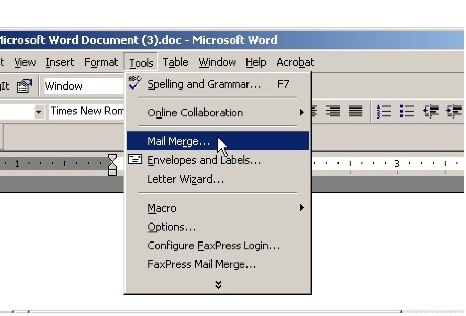
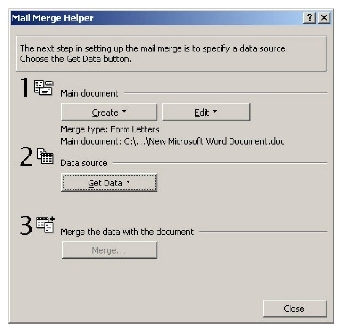
| 1. | Open Word and select Tools>Mail Merge to open the Mail Merge Helper. |
| 2. | In the Mail Merge Helper window, click Create. |
| 3. | Select Form Letters… from the context menu. |
| 4. | Select Active Window to make the current document a merge template, or to change the document type. Or, if there are no open documents, and you’d like to create a new merge template, select New Main Document. This will create a new blank template. |
| 5. | Use the Get Data button to specify your data source, or use the Edit button to edit your document. Merged documents are faxed without a cover page. To include a cover page, set up the first page of the document to be the cover page. |
| 6. | The appearance of your MS-Word tool bar will now include new Mail Merge icons. |
After you’ve created a Main document/template, you’ll need to attach a data source. For faxing, the data source is typically a contact list or phonebook.
Your data source must contain a field with the fax number for each recipient.
To attach a data source to your Main document/template, follow these steps:
| 1. | From Mail Merge Helper, click on the Get Data button and select Open Data Source, which will allow you to connect to an existing data source. |
| 2. | A data source can be any of the following types of files: Word document, Excel spreadsheet, Access Database, dBase file, Text or CSV file, or MS Query file. In this example, Castelle.mdb is an Access database that contains fax numbers. |
In the Files of Type field, make sure the correct kind of data source is selected (MS Access in this case), then navigate to and select the data source file. Other data sources can be accessed using MS Query provided that the ODBC driver for that data source is installed.
| 3. | If you have mapped a database, a dialog box will ask you to select a Table or Query. In this example, we have attached an Access database, so the Microsoft Access dialog box is displayed. Select an item from the Table or Query tab. |
| 4. | Word will now try to import the table fields into your Main document. But because we have not inserted the fields yet, the following message will be displayed |
Now we edit the Main document to insert fields.
To insert the merge fields, follow these steps:
| 1. | From your Main document, select MailMerge from the Tools pull down menu. The Mail Merge Helper will again be displayed. |
| 2. | Select Edit. |
| 3. | A drop down list will display all the available Main documents. Select the one you just created. Two new fields are now displayed in your Word toolbar, Insert Merge Field and Insert Word Field. |
| 4. | To insert the fields from your attached filed or database into your document, put your cursor where you want the field located in your Main document and click on the Insert Merge Field button. You will see a dropdown list of available fields. |
The fields that appear in the drop down list will reflect the fields defined in your data source.
| 5. | Click on a field (i.e., FirstName in the above example). The field will be inserted into your document and look like this: |
<<FirstName>>
| 6. | Repeat until done. |
| 7. | Preview results. You can use the << >> button on the toolbar to preview the merged data. It will replace all merge fields with the data from the records. |
The following is a sample template letter with field codes inserted.
Castelle
855 Jarvis Drive
Morgan Hill, CA 95037
(408) 852-8000
<<FirstName>><<LastName>>
<<CompanyName>>
<<Address>>
<<City>>, <<StateOrProvince>> <<PostalCode>>
Dear <<FirstName>>,
Thank you for your interest in Castelle’s products.
Yours truly,
Gerard Manley Hopkins
When you start the process of faxing, you will first be asked to map data source names to FaxPress Premier names. When you have finished the mapping, faxing will start automatically. To fax your merged document, follow these steps:
| 1. | Select Tools>FaxPress Mail Merge. |
| 2. | Open the document that you have prepared for mail merging with the attached a data source and embedded data source fields. |
| 3. | From the Word Tools menu, select the FaxPress Mail Merge menu item. |
FaxPress will first check for the presence of your data source and required program files. If needed elements cannot be found, then the process will exit.
| 4. | Word will prompt you to save your document, if it needs saving, and then minimize itself. The FaxPress Fields Map will then be displayed. |
| 5. | To create a mapping, select a pair of fields and click on Map >>. |
The Mail Merge Fields dropdown list contains the field names that are present in the data source.
The FaxPress Fields dropdown list contains fields that FaxPress understands.
For each mapping, choose a pair from the dropdown lists and click on Map >>.
The list box on the right will keep track of your mappings.
Each time you map a field, its name will be deleted from its list box and added back when the mapping is deleted.
The FaxPress field Fax Number must be mapped.
| 6. | To delete a mapping, select a mapping and click on << Delete. |
| 7. | When done, click OK start the merging and faxing or Cancel to abort. |
| 8. | The FaxPress Login maybe displayed if you have not configured FaxPress for automatic login. You can select Configure FaxPress Login from the Tools menu item in MS-Word to configure your login. If you want to automate the login process, simply click the box for Use these settings next time. |
When you press the OK button, the macros do the following.
| ■ | Retrieve information from the data source for each field in the template document. |
| ■ | Print each merged document to the Castelle DCX Driver. |
| ■ | Submit each merged document to the FaxPress Premier for faxing. |
The time to merge and print each document will vary depending on how many merge fields exist in the document, how large the document is, and how many records are in the data source.
|
FaxPress Enterprise & Enterprise Redundant WebHelp
Last Updated: 11/1/2007
E-mail this page |
Castelle 855 Jarvis Drive, Suite 100 Morgan Hill, CA 95037 Toll-free 800.289.7555 Tel 408.852.8000 Fax 408.852.8100 |