Configuring Outlook Direct
After completing the FaxPress client and Outlook Direct setup, you can configure the Outlook Direct client settings according to the individual requirements of your users. Use the FaxPress Transport Properties to customize both Outlook Direct’s incoming and outgoing transmission parameters according to the information provided in this chapter.
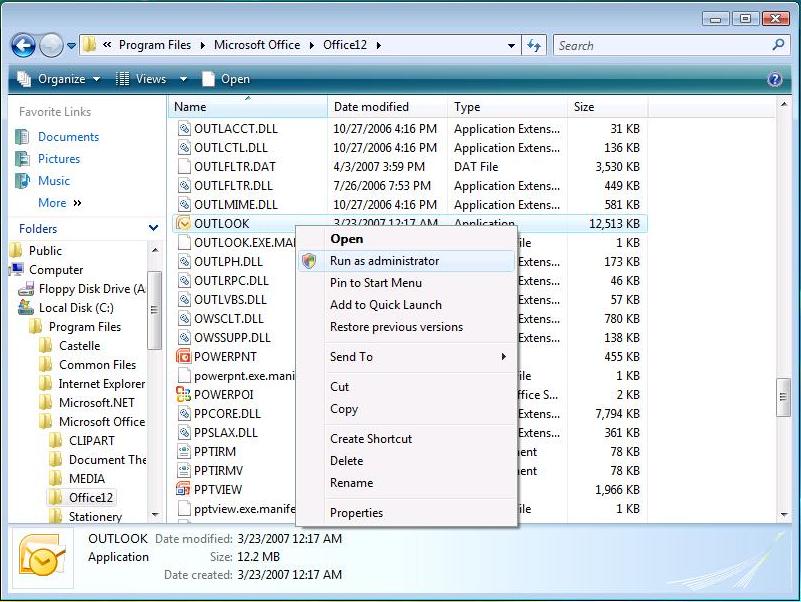
Before configuring Outlook Direct in Windows Vista, perform the following action:
| 1. | Open Windows Explorer. |
| 2. | Navigate to the folder where Outlook is installed (e.g., \Programs Files\Microsoft Office\Office 12\). |
| 3. | Right-click on the Outlook icon. |
| 4. | Select Run as administrator. Login as an administrator in the dialog box, and continue with configuring Outlook Direct. |
Setting the FaxPress Transport Properties
The FaxPress Transport Properties collection of dialog boxes appears whenever FaxPress Outlook Direct is added to a profile. The FaxPress Transport Properties contains the following tabbed dialog boxes.
| ■ | Login |
| ■ | Outgoing Faxes |
| ■ | Incoming Faxes |
| ■ | Administrator |
| ■ | General |
| ■ | Log |
You can access the FaxPress Outlook Client Properties in one of the following two ways:
| 5. | From the Control Panel, click on Mail and Fax, or |
| 6. | The Mail folder, and select Properties for FaxPress Outlook Direct. |
Open Outlook, click on the Tools drop-down menu, click on Castelle FaxPress Tools, and select Options.
The FaxPress Transport Properties dialog box will appear with the FaxPress Login tab selected. Login occurs automatically when you open your mail client.
The Login dialog box provides the parameters the transport needs to communicate with the FaxPress server. This information lets the transport log into the user’s FaxPress account to send and receive faxes and to monitor activity on the FaxPress: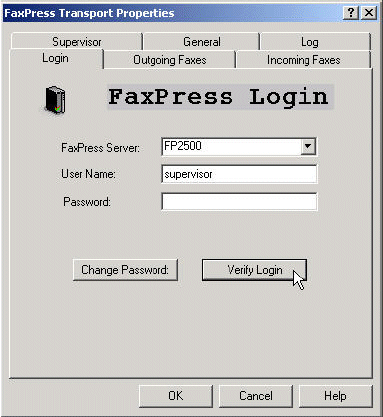
FaxPress Server – displays the name or IP address of the FaxPress server on your network segment. If the FaxPress server is not on your network segment, you will have to manually specify the FaxPress server’s IP address. Refer to your FaxPress Administrator’s Guide for directions.
User Name and Password – displays the user name and password of your FaxPress server account.
Verify Login – verifies that the login parameters are valid.
Change Password – use to reset user password.
If the transport appears unable to log in to the FaxPress Server when you open Outlook, or if you’re checking the Transport Properties with your mail client closed, use the Verify Login button to confirm that server and client are communicating.
Login and General parameters cannot be modified while MAPI32.exe is running. To modify your login settings, first close your Outlook or Outlook mail client, reboot your system, then open the Transport.
The General dialog box provides the parameters the transport needs to communicate with your email account. These settings can only be changed from within the Control Panel by a user with administrator privileges on the workstation. MAPISP32.exe must not be running.
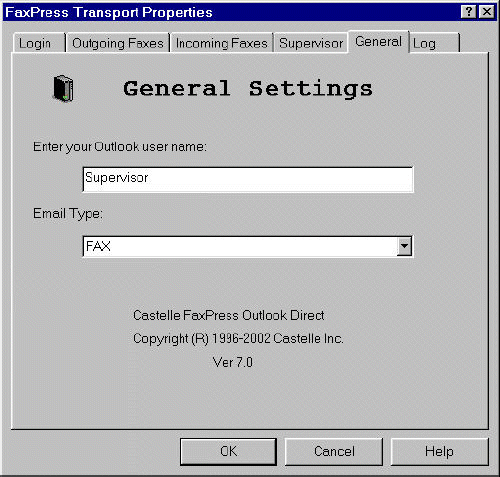
Enter your Outlook user name – your email user name.
Email Type – the type of email service being used. The default value is FAX. The optional value is FAXPRESS. If you intend to use the default FAX email type, removing the Microsoft Fax service from the Mail/Mail and Fax folder in the Control Panel is highly recommended.
If, however, you rely on the Microsoft Fax service to send faxes, choose FAXPRESS rather than FAX. Using FAXPRESS for the FaxPress Outlook client avoids conflicts with Microsoft Fax. When FAXPRESS is used, though, Outlook users cannot use the Fax Addresser (i.e., the Business Fax entries in the Contacts list) to send faxes. To access this setting, MAPISP32.exe must not be running; reboot the system before modifying.
Administrator and Unaddressed Fax Properties
The Administrator dialog box is accessible to, and the settings can only be modified by, users with FaxPress Administrator privileges.
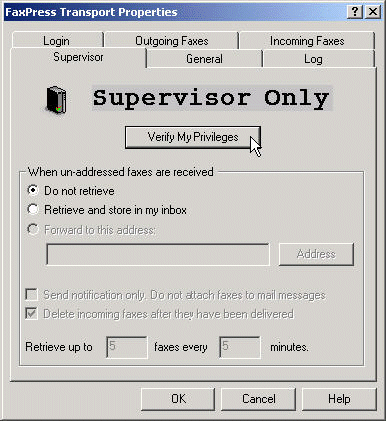
When your mail client is not running, and the Transport has not yet logged in to the FaxPress, verify your Administrator privileges by clicking on the Verify My Privileges button. The fields in the Administrator tab are disabled until privileges are verified.
Verify My Privileges – click to verify your FaxPress privileges and enable the Administrator tab’s features.
When Unaddressed Faxes are Received – allows the administrator to determine how the FaxPress handles incoming unaddressed faxes.
If your telephone system features automatic routing, users will be notified of properly addressed faxes received on the FaxPress. Automatic DTMF, DID, or assigned line routing provides each user with a personal fax number, and in doing so allows the transport to send an email notice directly to the user’s inbox when a new fax is found. Incoming faxes are, by default, converted to TIF format and attached to the email notice. They may also be viewed from your Outlook client inbox.
If your telephone system does not feature some kind of automatic DTMF, DID, or assigned line routing that provides you with a personal fax number, all incoming faxes will be stored in the FaxPress Unaddressed mailbox.
Do not retrieve – disable Outlook Direct’s client notification feature. If selected, Outlook Direct will not notify you of new faxes received by the FaxPress server.
Retrieve and store in my inbox – if selected, FaxPress Outlook Direct will send you an email notice with the incoming fax attached as a TIF file whenever FaxPress receives an unaddressed incoming fax. Users with Router and Administrator privileges can access the Unaddressed mailbox and route its contents to the intended recipients. See your FaxPress Administrator and Users’ Guide for more information regarding privilege levels.
Forward to this address – lets the Administrator forward an attached fax to another user. This option is only available when the mail client is running because access to the Address Book is required.
Address – select the name of the user’s mail profile to which you want the faxes forwarded.
Send notification only. Do not attach faxes to mail messages –When a fax is received in your FaxPress Unaddressed mailbox, the fax is by default attached as a TIF file to a notice and sent to your mailbox. This option lets you decline to have the fax file attached, and instead view the fax from your Castelle FaxPress Tools menu (see Viewing Faxes). Your FaxPress transport’s Incoming Faxes dialog box (see Incoming Fax Properties MS Outlook Environments) also allows you to configure incoming fax parameters.
Delete incoming faxes after they have been delivered – delete incoming faxes on the FaxPress server after they are attached to notices and sent to your mailbox.
Retrieve up to __ faxes every __ minutes – control the flow of fax notices from the FaxPress.
The Event Logging dialog box lets you monitor the transport’s fax transactions – outgoing and incoming faxes and error messages. Notepad is the default viewing application. Click View to display the log file.
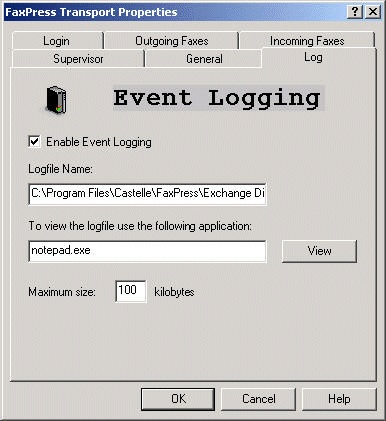
Enable Event Logging – enable/disable Event logging
Logfile Name – name of the file where the log information is stored
To view the logfile use the following application—the text editor used to read the log file; Notepad is the default text editor. If you use another editor, enter the path to the executable if it is not in your arch path.
View – display the log file
Maximum size: kilobytes – restrict the size of the log file; when the log file exceeds this size, the file will be truncated.
Outgoing Fax Properties
The Outgoing Faxes dialog box lets you set the outgoing fax transmission parameters: the time faxes are sent, the cover page to accompany your fax and the handling of failed faxes.
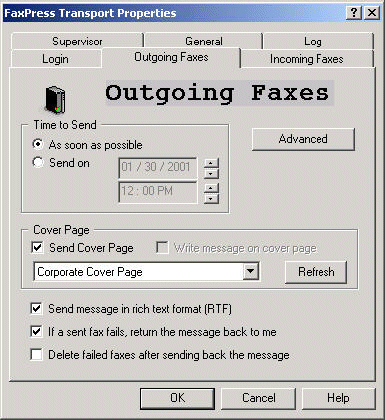
Time to Send:
As soon as possible – send the fax at the first available opportunity
Send on – specify a date and time faxes are to be sent
Cover Page:
Send Cover Page – enable/disable the send cover page feature in the FaxPress; you can select the corporate cover page or your personal cover page. Instructions for creating a personal cover page are available in the FaxPress Help menu and your FaxPress Administrator and Users’ Guide.
Write message on cover page – display the e-mail message text on the fax cover page (available only when Send Cover Page is checked, and Send message in rich text format (RTF) is NOT checked.)
Refresh – this refreshes the list of personal cover pages.
Send message in rich text format (RTF) – with RTF enabled, the message will be sent as an attachment following the cover page.
If a sent fax fails, return the message back to me – FaxPress will return a fax it is unable to send; the fax is attached to the failure notice. FaxPress will delete the failed fax after sending a fail notice.
Delete failed faxes after sending back the message – FaxPress will delete the failed fax after sending a fail notice.
Advanced button – click to configure transmission properties for outgoing faxes.
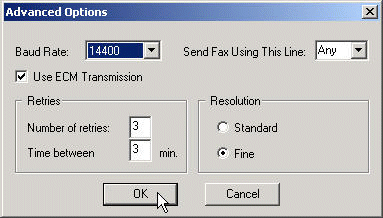
Baud Rate set the maximum rate of speed faxes will be transmitted.
Use ECM transmission – enable the error correction feature; this feature uses an algorithm to correct faxes that are corrupted during transmission.
Retries – specify how retries are handled
Number of retries – set the number of times FaxPress tries to send a fax before issuing a failure notice.
Time between retries – set the interval (in minutes) that the FaxPress waits before trying to resend a failed fax
Resolution – set the resolution for faxes.
Standard – Standard fax resolution is 100 dpi.
Fine – Fine resolution is 200 dpi.
The Incoming Faxes dialog box allows you to set incoming fax parameters. If enabled, the transport polls FaxPress periodically to check if any personal incoming faxes (faxes that have been routed to the user either by DID or manually) have been received. The user can choose to store the fax in the inbox, or forward it to an email address (which can also be a fax address).
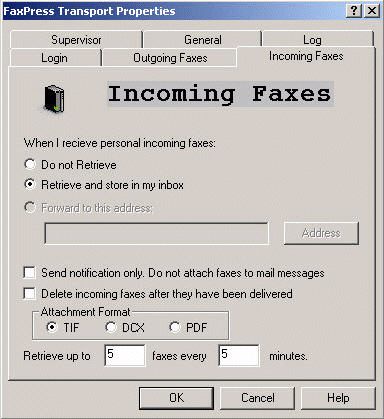
When I receive personal incoming faxes:
Do not Retrieve – disabled, Outlook Direct will not notify you of new personal faxes received by the FaxPress server. View incoming faxes from your inbox instead. See for details.
Retrieve and store in my inbox – Outlook Direct sends a notice to your inbox whenever you receive a fax on the FaxPress server. The incoming fax is converted to TIF, PDF, or DCX format and attached to the notice by default.
Forward to this address – forward an attached fax to another user. This option is only available when the Outlook client is running because the Transport needs access to the Address Book.
Address – enter the name of the user’s email profile to which you want your faxes forwarded.
Send notification only. Do not attach faxes to mail messages – When you receive a fax in your FaxPress mailbox, Outlook Direct by default attaches the fax to a notice and sends it as an email to your Outlook mailbox. This option lets you decline to have the fax file attached, and instead view the fax from the Castelle FaxPress Tools menu in your inbox (see Viewing Faxes). If you receive a large amount of faxes, you may want to enable this parameter so that fax transmissions do not dominate the workstation’s processor time.
Delete incoming faxes after they have been delivered –delete incoming faxes on the FaxPress server after they are attached to notices and sent to your Outlook mailbox.
TIF – default incoming fax file format.
PDF – optional fax file format. The PDF is actually an image file, so the content of the PDF will not be searchable.
DCX – optional incoming fax file format, not supported by Windows XP. If your OS supports it, select the DCX file format for faster incoming fax transmission.
Retrieve up to __ faxes every __ minutes – the polling interval and the number of faxes to retrieve per interval let you to control the flow of fax notices from the FaxPress.
Once retrieved from the FaxPress, the incoming fax is stored in the user’s mailbox. The fax comes attached to the message as a TIF, PDF or DCX file, which requires a third-party viewer. The Microsoft Windows 98/ME/NT/2000/2003 operating systems come with the default Imaging for Windows fax viewer. The Imaging for Windows fax viewer also supports the FaxPress’ optional DCX file format.
The Windows XP operating system comes with the Windows Picture and Fax Viewer, which supports FaxPress’ default TIF format, but not DCX. If your OS supports it, the DCX file format offers faster incoming fax transmission. Windows XP users must select the TIF file format as the default attachment format.
With either viewer, you should be able to simply double-click on the attached TIF or DCX file icon to view your fax.
The Castelle FaxPress Tools menu also allows you to directly view and control faxes in the incoming and outgoing FaxPress fax queues according to your privilege level.
To view the incoming and outgoing fax queues from your mail:
| 1. | Select Tools>Castelle FaxPress Tools. |
| 2. | Choose View Outgoing Faxes or View Incoming Faxes. The utility logs onto the FaxPress server with FaxPress account information from the user’s FaxPress Outlook Direct profile. Either the Outgoing Fax list or the Incoming Fax list from FaxPress is displayed. The user is granted the same privilege level as in FaxPress. |
| 3. | To exit the list, close the list or the FaxPress window. The utility then logs off the FaxPress. |
|
FaxPress Enterprise & Enterprise Redundant WebHelp
Last Updated: 11/1/2007
E-mail this page |
Castelle 855 Jarvis Drive, Suite 100 Morgan Hill, CA 95037 Toll-free 800.289.7555 Tel 408.852.8000 Fax 408.852.8100 |