Customizing the Outgoing and Incoming Imprint Header
Additional imprint header fields, created with imprint header keywords and non-keyword text, can be used to include information that might routinely appear on an outgoing fax cover and incoming page, such as:
| ■ | Sender fax phone number, voice number and email address. |
| ■ | Fax recipient name, company, fax number, voice number and email address. |
| ■ | Bates numbering (i.e., Bates stamping, Bates coding). |
For a complete list of available Imprint Header information, see Imprint Header Keywords.
Customizing the Outgoing Fax Imprint Header
To customize the outgoing imprint header:
| 1. | Go to Start>Settings>FaxPress Plus>FaxPress Plus. |
| 2. | Log in as Administrator to the FaxPress Premier server. |
| 3. | Right-click on the FaxPress Premier server name or serial number and select Properties. |
| 4. | Select the Advanced Functions tab. |
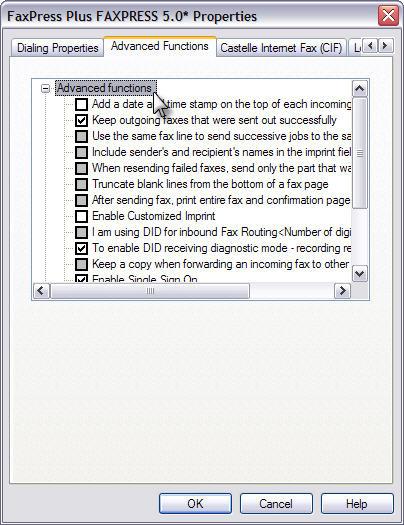
| 5. | Select the For outgoing faxes the imprint line on the top of the page option. Selecting this option will make the Settings button appear. Click the Settings button to access the Imprint Settings. |

If the Enable Customized Imprint option is already selected, you’ll need to de-select and then re-select it for the Settings button to appear.
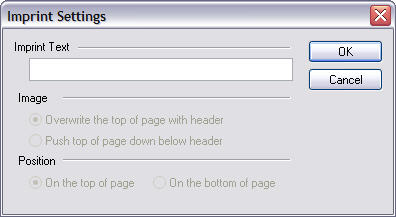
| 6. | Use the Imprint Text field of the Imprint Settings window to enter the combination of Imprint Header Keywords and non-Keyword text required to create the additional Imprint Header information fields. The Image and Position options are not available with FaxPress Premier 4.0. |
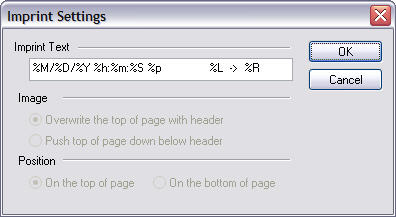
| 7. | The combination of Imprint Header Keywords and non-Keyword text define the additional information to include in the Imprint Header on outgoing faxes. For the complete list of Imprint Header Keywords, see Imprint Header Keywords. |
In the example here, %s, the space Keyword, is entered three times to define a margin three spaces wide before the date. Next, the text Date: is typed. All non-Keyword text will appear on the outgoing fax exactly as typed in the Imprint Text field. Next, the Imprint Header Keywords, separated by slashes (/), are entered: %M/%D/%Y. This will define the date as month, day, and year e.g.,12/21/2004.
To remove the Imprint Header field completely from your outgoing faxes, leave the Imprint Text field blank.
| 8. | Click OK to save your changes and return to the Advanced Functions window. |
Adding a Date and Time Stamp to an Incoming Fax
To customize the incoming imprint header:
| 1. | Go to Start>Settings>FaxPress Plus>FaxPress Plus. |
| 2. | Log in as Administrator to the FaxPress Premier server. |
| 3. | Right-click on the FaxPress server name or serial number and select Properties. |
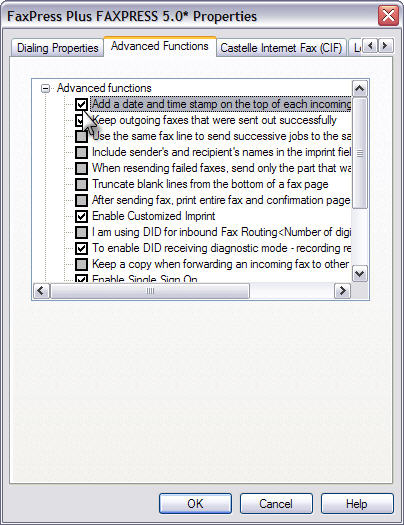
| 4. | Select the Advanced Functions tab. |
| 5. | Select the Add a date and time stamp on the top of each incoming fax print out option. |
| 6. | Modify the Incoming section of the Header.cfg file as shown in the Modifying Font Style and Size with the Header.cfg File below. |
Customizing the Incoming Fax Imprint Header
This feature adds incoming fax information to the stored fax image file. The changes are permanent. Use care when setting the Override setting to '0' (False). Doing so may add header information that covers or obscures the underlying fax image, which is unrecoverable once the imprint header is applied. The default Override setting is '1' (True), which replaces the one-line header each time the fax is updated/routed.
When this feature is enabled, the custom received fax imprint (as specified in the [incoming] section of the header.cfg file) will be permanently applied to the received fax. (It also has the effect of disabling printing of the received fax imprint when those features are selected for printing faxes.)
To enable this feature, in the [Incoming] section of header.cfg, add the statement:
Make Permanent=1
To disable this feature, in the [Incoming] section of header.cfg, add the statement:
Make Permanent=0
Enabling this feature disables the Add a date and time stamp on the top of each incoming fax print out function.
If [Incoming] Enabled=0 (Disabled)
If Add a date and time stamp on the top of each incoming fax print out is enabled, the date/timestamp is printed on top of the first page.
If Add a date and time stamp on the top of each incoming fax print out is disabled, nothing is printed.
If [Incoming] Enabled=1 (Enabled)
If Add a date and time stamp on the top of each incoming fax print out is enabled, the date/timestamp function is overridden and replaced by information configured in the header.cfg file.
If Add a date and time stamp on the top of each incoming fax print out is disabled, information configured in the header.cfg file.
Modifying Font Style and Size with the Header.cfg File
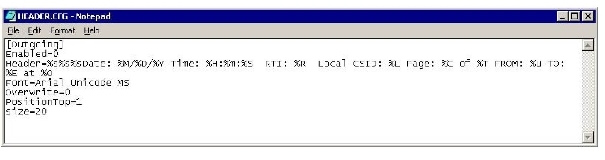
Enabling the imprint header in the Advanced Functions creates a header.cfg file in the C:\Castelle\system\cfg\ directory of the FaxPress Plus server. The header.cfg file allows you to change the information shown on the outgoing imprint header, and to place custom header information when printing an incoming fax directly from the FaxPress server. The header.cfg is divided into two sections, as shown below: [Outgoing] and [Incoming].
To enable the outgoing and/or incoming fax header, set Enabled to ’1’.
To place the outgoing or incoming imprint on top of the page, set PositionTop to ’1’. To keep the imprint header on the bottom, set PositionTop to ’0’.
To scale a printed document so that all its contents fit on one page, see Setting Printer Configuration Properties.
See the Imprint Header Keywords section below to customize the information shown in the outgoing and/or incoming imprint headers. The keywords must be within quotation marks in the Header= setting in either the outgoing or incoming section of header.cfg, as shown below.

Font style and size can also be edited using the Font and Size tags, as shown in the header.cfg shown below. The system default font and size is used if these settings are ommitted.
The Bates numbering format is configured via configuration files only. There is no user interface for setting this functionality.
To add Bates numbering to the header, the configuration file bates.cfg must be present on the FaxPress Plus server in the directory C:\Castelle\System\Cfg\.
The header.cfg file must also be changed so that the Bates number appears in the proper location on the fax.
In the header.cfg file, use the Bates format character %b wherever you need the Bates number to appear. The Bates format character can be used along with existing header codes to create a custom header. For more information, see the header customization sections above.
To enable Bates numbering on your fax outputs:
| 1. | Locate the bates.cfg file in the C:\Castelle\System\Cfg\ directory of the FaxPress Plus server and open it in any text editor. If the file is not present, create a new text file and name it bates.cfg, then open it in any text editor. |
| 2. | Enter the following section in the bates.cfg file: |
[Default]
Enabled=1
Prefix=
Suffix=
ID Format=
The following table provides the different settings that can be applied in the bates.cfg file:
| Selection | Default | Settings |
| Enabled | 0 | 0 = disabled; 1=enabled |
| Prefix | (blank) | User select |
| Suffix | (blank) | User select |
| ID Format | xxxxxxxx/xxxx | User select |
| 3. | Once the information has been entered into the bates.cfg file, the header.cfg must now be updated to include the information from the bates.cfg file. This is done by using the %b and %i variables in the header.cfg file; the %b variable is the unique identifier for each page, and the %i variable defines the page range, listing the first page of the document and the last page of the document as defined by the ID Format selection (e.g., xxxxxxxx/xxxx). |
| 4. | Open the header.cfg file. |
Make Permanent=1
Header=" Bates Page %b of docID %i"
| 5. | The bates.cfg file should now be customized to display unique identifying information. The Prefix, Suffix and ID Format should be edited to reflect the required information in the fax headers. Use the following example to analyze the eventual output: |
[Default]
Enabled=1
Prefix=THELAW
Suffix=BOB
ID Format=xxxxxxxx/xxxx
| 6. | Here is an example taken from the header of each page of a five-page output: |
Bates Page THELAW88005255BOB of docID THELAW88005255/5259BOB
Bates Page THELAW88005256BOB of docID THELAW88005255/5259BOB
Bates Page THELAW88005257BOB of docID THELAW88005255/5259BOB
Bates Page THELAW88005258BOB of docID THELAW88005255/5259BOB
Bates Page THELAW88005259BOB of docID THELAW88005255/5259BOB
Use the keywords provided here to customize the Imprint Header information on outgoing and incoming faxes.
|
Code |
Number of Characters/Width |
Meaning |
|
%s |
1-? |
Space |
|
%M |
2 |
Month |
|
%D |
2 |
Day |
|
%Y |
4 |
Year (YYYY) |
|
%y |
2 |
Year (YY) |
|
%H |
2 |
Hour (24) |
|
%h |
2 |
Hour (12) |
|
%p |
2 |
AM/PM |
|
%m |
2 |
Minute |
|
%S |
2 |
Second |
|
%X |
0 |
Put in front of date/time string, means date/time transmitted/received (default) |
|
%P |
0 |
Put in front of date/time string, means date/time printed (received faxes only) |
|
%L |
20 |
Local CSID |
|
%R |
20 |
Remote ID |
|
%C |
2 |
Current page |
|
%T |
2 |
Total pages received/transmission |
|
%N |
2-3 |
Connection time |
|
%A |
1-2 |
Channel used |
|
%V |
1-? |
Server used |
|
%F |
1-? |
Image file name |
|
%J |
1-8 |
Job ID |
|
%I |
1-8 |
User ID |
|
%U |
1-? |
User name |
|
%E |
1-? |
Fax recipient name |
|
%O |
1-? |
Fax recipient company |
|
%B |
1-? |
Fax recipient fax number |
|
%% |
1 |
|
|
%G |
2 |
Bill Back Code |
|
%g |
2 |
Bill Back Matter |
|
FaxPress Premier WebHelp
Last Updated: 11/1/2007
E-mail this page |
Castelle 855 Jarvis Drive, Suite 100 Morgan Hill, CA 95037 Toll-free 800.289.7555 Tel 408.852.8000 Fax 408.852.8100 |