Installing the FaxPress Plus Client on Terminal Server
The FaxPress Plus client for Windows Terminal Server is designed for Windows Terminal Server and Citrix only, and will not work on other network installs.
The FaxPress Plus client for Windows Terminal Server supports these Terminal Server editions:
| ■ | Windows NT Server 4.x, Terminal Server Edition |
| ■ | Windows 2000 Server, Terminal Services |
| ■ | Terminal Server for Windows Server 2003 |
Before installing the FaxPress Plus client for Terminal Server, please confirm the FaxPress Premier is operational (i.e., can send and receive faxes).
Preparing the Windows Terminal Server
Before installing the FaxPress Plus client for Windows Terminal Server, make sure you have:
| ■ | set root drive mapping and run logon and compatibility scripts for each Terminal Server user. Refer to the Microsoft Knowledge Base: http://support.microsoft.com/support/kb/ and the Microsoft Terminal Server page: http://www.microsoft.com/ntserver/terminalserverfor additional information regarding drive mapping, logon and compatibility scripts. |
| ■ | created and configured user profiles for any applications intended for integration with FaxPress – eg, Microsoft Outlook. |
Next, be sure to:
| ■ | disable all anti-virus programs running on the Terminal Server. |
| ■ | close the Microsoft Outlook client and remove Microsoft Outlook from the StartUp folder. (Start>Programs> StartUp) |
| ■ | close all programs and reboot. This guarantees that Microsoft email is not running in the background. |
Running the Setup - Important Information!
Running the FaxPress Plus client for Windows Terminal Server setup is different from running the other FaxPress Plus client installations, in that the Terminal Server must be in install mode for the required compatibility scripts to run during setup.
For the Terminal Server to be in install mode and for the required compatibility scripts to run during setup, you will have to exit out of the FaxPress setup, and install the FaxPress Plus client from the Windows Add/Remove Programs Control Panel.
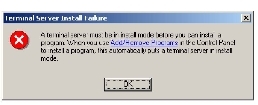
Installing the FaxPress Plus client from Add/Remove Programs in the Control Panel automatically puts the Terminal Server in install mode. In fact, if you are running the installation on a Windows 2000/2003 server, the following message will appear when the FaxPress setup is launched.
Follow these steps to install the FaxPress Plus client for Terminal Server:
| 1. | Place the FaxPress Setup CD into your computer’s CD-ROM drive. |
| 2. | Hold down the Shift key to disable the auto-run feature on the CD-ROM. |
The Terminal Server must be in install mode for the required compatibility scripts to run during setup. You must install the FaxPress Plus client from Add/Remove Programs in the Control Panel to automatically put the Terminal Server in install mode.
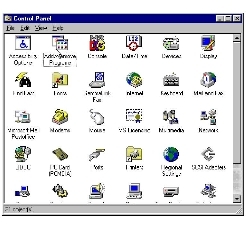
| 3. | Open the Control Panel. (Start>Settings>Control Panel) |
| 4. | Double-click on Add/Remove Programs. |
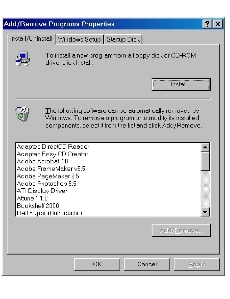
| 5. | From the Add/Remove Programs Properties window, click Install. |
| 6. | Click Next>. |
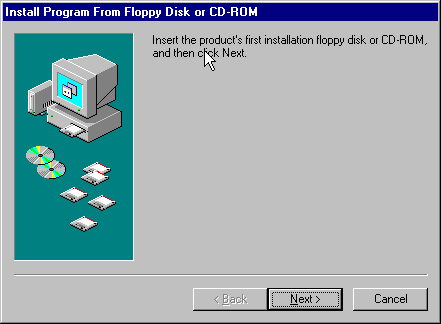
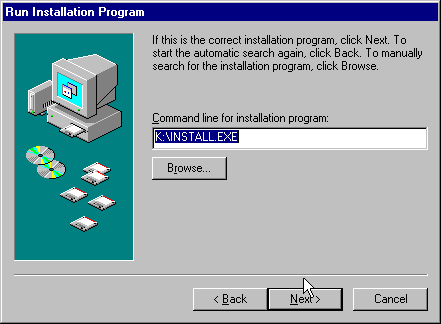
| 7. | In the Run Installation Program window, install.exe will appear in the Command line for installation program field. Click Next>. |
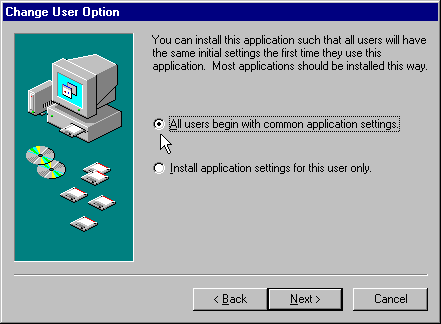
| 8. | In the Change User Option window, select All users begin with common application settings, then click Next>. |
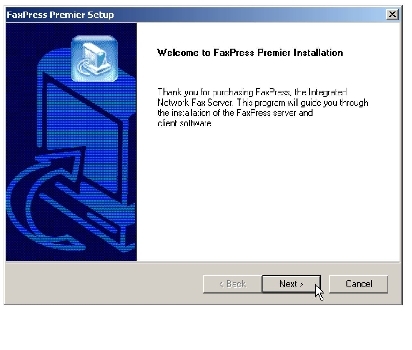
| 9. | In the Welcome to FaxPress Premier Installation screen, click Next>. |
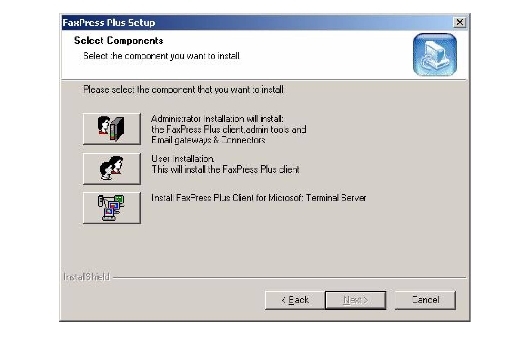
| 10. | From the Select Components screen, select Install FaxPress Plus client for Microsoft Terminal Server, then click Next>. |
| 11. | In the Default Protocol window, select the TCP/IP, IPX/SPX, or NetWare 5 radio button, then click Next>. |

| 12. | In the Destination path screen, confirm the Destination Folder is Drive letter:\Program Files\Castelle\FaxPress where Drive letter is the NT Terminal Server root directory. Make sure the Castelle files are copied to the WinNT root drive only. Do not copy the Castelle files to any other mapped directory. Click Next>. |
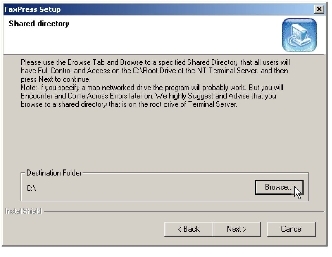
| 13. | The Shared Directory screen requires you to click Browse to specify a shared directory for the FaxPress host.ip file. This folder must be accessible to all Terminal Server users and should be located on the Terminal Server machine. |
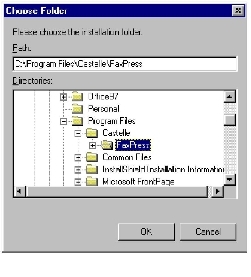
| 14. | In the Choose Folder window, select FaxPress. |
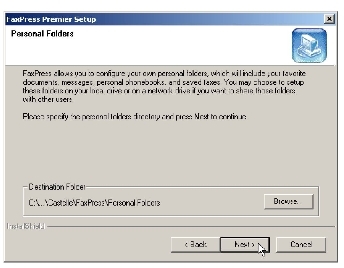
| 15. | The Personal Folders screen requires you to specify a location for your Personal Folders directory. Click Next> to select the default location, or Browse to select a different one. |
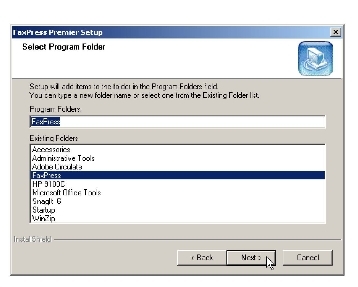
| 16. | In the Select Program Folder window, click Next>. |
| 17. | The FaxPress Outlook Direct for Terminal Server clients provides you the option of installing the FaxPress Outlook Direct email gateway. Outlook Direct offers seamless fax/email integration, offering users the ability to send and receive faxes right from the Outlook mail client interface. Check the Install FaxPress Plus Outlook Direct box and click Next> to install Outlook Direct. Otherwise, click Next>. |
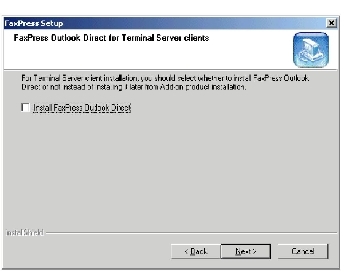
FaxPress Outlook Direct, formerly called Exchange Direct, is a client-side service software option that provides a simplified, cost-effective way for Microsoft Outlook users to send and receive faxes. The Castelle FaxPress Transport, a service added to your email profile, connects Outlook to the FaxPress server. Client rather than server-based, Outlook Direct has the ability to operate independently of an Exchange server, making it ideal for smaller networks. Outlook Direct is not the ideal choice, however, for a remote, dial-up or Virtual Private Network connection.
Refer to the FaxPress Premier Email Gateways Guide for information on Outlook Direct fax addressing requirements.
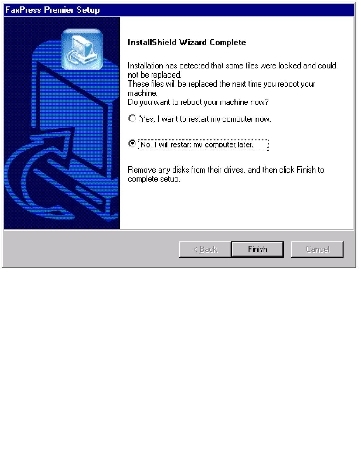
| 18. | In the Setup Complete window, select No, I will restart my computer later, then click Finish to exit the FaxPress Setup Wizard and return to Microsoft’s Installation Program to complete the setup. The FaxPress Plus client installation will be incomplete if you reboot before finishing Microsoft’s installation program. |
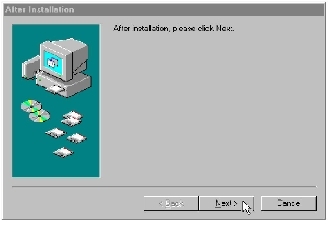
| 19. | When the After Installation screen appears, indicating you’ve returned to the Microsoft Add/Remove Programs wizard, click Next>. |
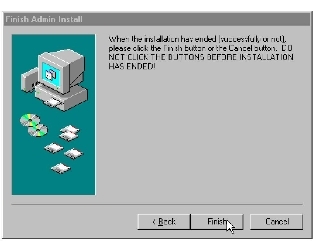
| 20. | When the Finish Admin Install window appears, click Finish, then reboot the Terminal Server. After rebooting, log in to the FaxPress Plus client to send and receive test faxes. |
Setting up the FaxPress Plus client and DCX Print Driver for Published Applications
For attached files to be converted to faxable format, and transmitted through the FaxPress, you must configure the DCX Print Driver for Published Applications on Citrix and Terminal Server. Setting up the DCX Print Driver for Published Applications on Citrix and Terminal Server requires you to:
| ■ | Download the FaxPress 7.1 from Castelle's website at http://www.castelle.com. This version provides the DCX Driver for Terminal Services. |
| ■ | Edit the existing Published Application or create a new Published Application.Once you've created a published application to support the FaxPress DCX print driver, you'll need to modify the application string to support 'Fax DCX print driver'. |
Known issues exist with ASP and SAP Custom Databases and Applications printing to the Fax DCX Printer.
To set up an Adobe published app, for example, follow these steps:
| 1. | For each seamless published app, from the Citrix console, right-click on the application and select Properties. |
| 2. | On the Application Location tab, in the Command Line box, insert the text: |
"C:\Program Files\Castelle\FaxPress\Daemon.exe" -P
before the application name. Citrix will add the quotes for you. For instance, to publish Adobe Acrobat Reader, you'd start with the application command line:
"C:\Program Files\Adobe\Acrobat 5.0\Reader\AcroRd32.exe"
then change it to read:
"C:\Program Files\Castelle\FaxPress\Daemon.exe" -P"C:\Program Files\Adobe\Acrobat 5.0\Reader\AcroRd32.exe"
Make sure the path names are entered with no spaces.
To set up a Microsoft Word 97 published app:
| 1. | For each seamless published app, from the Citrix console, right-click on the app and select Properties |
| 2. | In the Application Location tab, in the Command Line box, insert the text: |
"C:\Program Files\Castelle\FaxPress\Daemon.exe" -P
before the application name. For instance, to publish Adobe Acrobat Reader, you will start with the application command line:
"C:\Program Files\Microsoft Office\Office\WinWord.exe"
Citrix will have put quotes around the path name for you.
Next, modify this to read:
"C:\Program Files\Castelle\FaxPress\Daemon.exe" -P"C:\Program Files\Microsoft Office\Office\WinWord.exe"
Make sure the path names are entered with no spaces.
The daemon is provided with concurrency issue handling; it internally ensures that only one copy of it is active. Application open and close order is irrelevant; if the app with the currently active daemon is closed, one of the other daemons is awakened and becomes active. Inactive daemons, according to the MS discussion of the API calls, take up no CPU time.
Adding Outlook Direct Transport to User Profiles
The FaxPress Outlook Direct service software enables Terminal Server clients to use the FaxPress server to send and receive faxes via Exchange or Outlook.
For fax/email integration, the FaxPress Outlook Direct Transport must be added to the list of available services for each user’s Mail profile, then configured with both the FaxPress login and password information, and the user’s Outlook mailbox name.
The transport cannot be configured while the mail client is running. Always close the Outlook or Exchange client when modifying transport information.
Launch a Terminal Server client. Open the Mail or Mail and Fax control panel. (Start>Settings>Control Panel>Mail)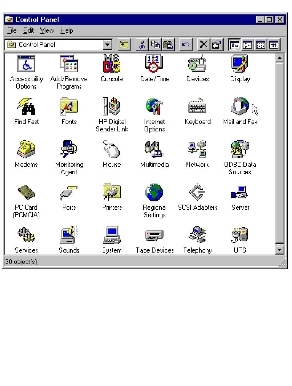
| 3. | In the mail Properties window, click Show Profiles. |
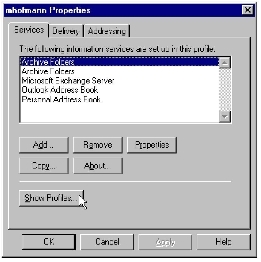
| 4. | Select the User Profile to edit, then click Properties. |

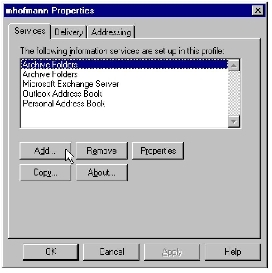
| 5. | In the user’s Properties window, with the Services tab selected, click Add. |
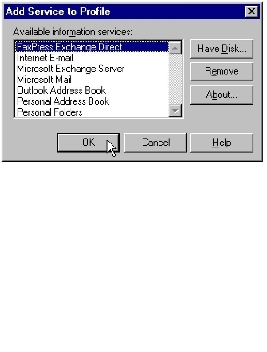
| 6. | In the Add Services to Profile window, select FaxPress Exchange Direct, and click OK. |
| 7. | The Login tab of the FaxPress Transport Properties dialog box provides the information required for the transport to log in to the user’s FaxPress account. Select the FaxPress Server name or IP address from the pull-down menu. Enter the user’s FaxPress User Name and Password, then click the Verify Login button. |
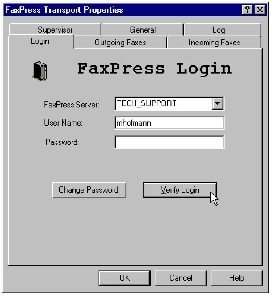
Login is automatic and occurs when you open the mail client. If the transport can’t log onto the server, you will be notified only after you try to send a fax. Use the Verify Login button to confirm login.
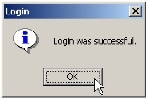
| 8. | This Login successful message will appear if the transport is able to connect to the Faxpress server. Click OK. |
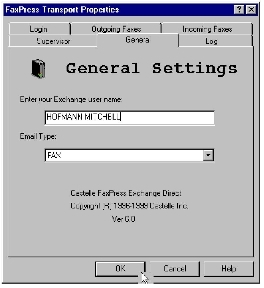
| 9. | Select the General tab, then enter the user’s Exchange or Outlook User Name. Select FAX from the Email Type pull-down menu. Click OK, then exit. |
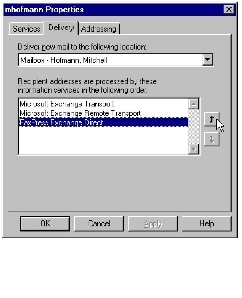
| 10. | From the user’s mail Properties dialog box, and select the Delivery tab. Select FaxPress Exchange Direct from the list of information services, then click the Up arrow to place it first in the list. |
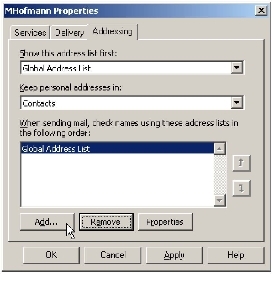
| 11. | Select the Addressing tab, then click Add. . . |
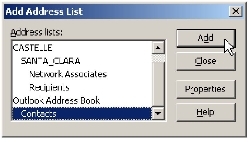
| 12. | From the Add Address List window, select Contacts and click Add. Click Close to save and exit. |
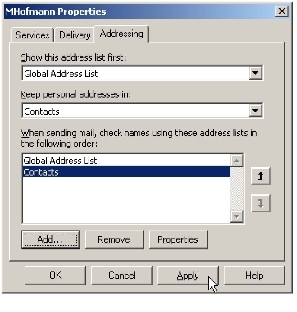
| 13. | Contacts should now appear as an address list option. Click Apply, then OK to exit. |
| 14. | Close all programs and reboot the Terminal Server. After rebooting, have all the users log in and send test faxes to confirm the setup’s success. Also, make sure any shared resources, such as network drives or printers, are set up for each user before using FaxPress. |
Installing on a Novell Network
In a Novell Netware environment with an active Microsoft Windows Terminal Server, FaxPress uses TCP/IP for FaxPress server to client communication.
To confirm that the FaxPress is able to communicate using TCP/IP:
| ■ | the FaxPress server must be assigned an IP address. |
| ■ | the FaxPress Plus client must be set to use TCP/IP as the default network protocol, a selection made during the client setup. |
| ■ | the FaxPress must be able to successfully send and receive test faxes. |
To assign the FaxPress Server an IP address, follow these steps:
| 1. | On a Windows 95/98, Me, NT or 2000/2003 workstation with the FaxPress Plus client for Administrators installed, launch the FaxPress Configurator for IPX/SPX. (Start>Programs>FaxPress Plus>Administration Tools> FP Configurator for IPX/SPX) |
| 2. | In the FaxPress Configuration (IPX protocol) window, enter your FaxPress Server’s serial number, click Show Settings, then IP settings. |
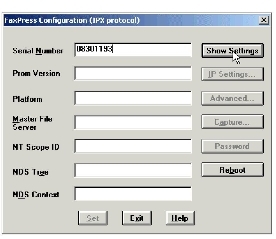
| 3. | Enter an IP address in the FaxPress IP Address field, and a subnet mask address in the IP Mask field. Click the Set, then the Exit button. Reboot the FaxPress server. |
Leave the Gateway and Master File Server IP Addresses blank.

Removing FaxPress from the Terminal Server
Follow these steps to remove FaxPress from the Terminal Server:
| 1. | Go to Start Menu/Programs/Command Prompt, CD to C:/FaxPress/PrintDriver and type DcxSetup -d, then press Enter to uninstall the DCX Print Driver. |
| 2. | From the Control Panel click on Add/Remove Programs. Select the FaxPress program and remove it from the program list. |
| 3. | Go to Start Menu/Find/Files Or Folders and type in FaxPress.INI and Delete all the FaxPress.INI files |
| 4. | Delete all Castelle entries from registry: HKEY_CURRENT_USER/SOFTWARE and HKEY_LOCAL_MACHINE/SOFTWARE |
| 5. | Reboot the NT Terminal Server system. |
Installing Software from the Network
To use the client workstation installation program stored on the network during the FaxPress server software installation:
| 1. | Log onto the network and open Windows 3.x, 95, 98/Me, NT, 2000/2003, XP or Vista. |
| 2. | Open the File Manager or Windows Explorer. |
| 3. | Open the drive containing the client workstation files. |
| 4. | Locate and open the \Castelle directory. |
| 5. | Locate and open one of the following subdirectories: |
For Novell network environments:
| ■ | Win16—For Windows 3.x |
| ■ | Win32—For Windows 95/98, NT, 2000/2003 and Vista |
For Windows environments:
| ■ | FPCLIENT.16—For Windows 3.x |
| ■ | FPCLIENT.32—For Windows 95/98, NT, 2000/2003 and Vista |
| 6. | Locate and double-click on rsetup.exe to start the installation program. |
If you install the client software from the network, you can only choose either the Typical or Compact installation. You will not be able to install the administration utilities that are available when installing the Administrator installation option.
|
FaxPress Premier WebHelp
Last Updated: 11/1/2007
E-mail this page |
Castelle 855 Jarvis Drive, Suite 100 Morgan Hill, CA 95037 Toll-free 800.289.7555 Tel 408.852.8000 Fax 408.852.8100 |