Faxing with the Lotus Notes Gateway
The FaxPress Lotus Notes Gateway allows FaxPress users to send and receive fax messages as easily as email messages. Attachments are rendered into fax file format for most applications, allowing attached files to be sent to fax and email recipients simultaneously.
A FaxPress account is required to send fax messages through the FaxPress Lotus Notes Gateway. The FaxPress Lotus Notes Gateway accesses your FaxPress account, then uses the account information to prepare and send your fax.
With the FaxPress Lotus Notes Gateway’s Auto Registration feature enabled, a new FaxPress account will be automatically created, if there isn’t an existing one, from the user’s email profile information the first time a fax message is sent. (See Additional Lotus Notes Gateway Configuration Options for information on Auto Registration.)
The Lotus Notes Gateway can be configured to route inbound fax messages received by the FaxPress directly to your mail client inbox if your company’s phone system supports some form of automatic routing – Direct Inward Dialing, for example.
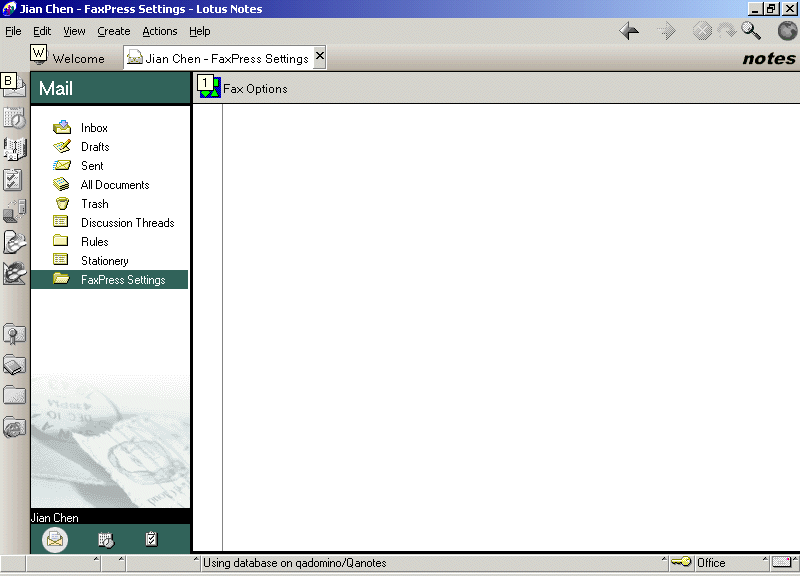
Configuring the FaxPress Fax Options
The FaxPress Fax Options template provides default settings for sending faxes.
To customize your FaxPress Fax Options, follow these steps:
| 1. | From the Lotus Notes inbox, select the new FaxPress Settings Mail directory, then click Fax Options. |
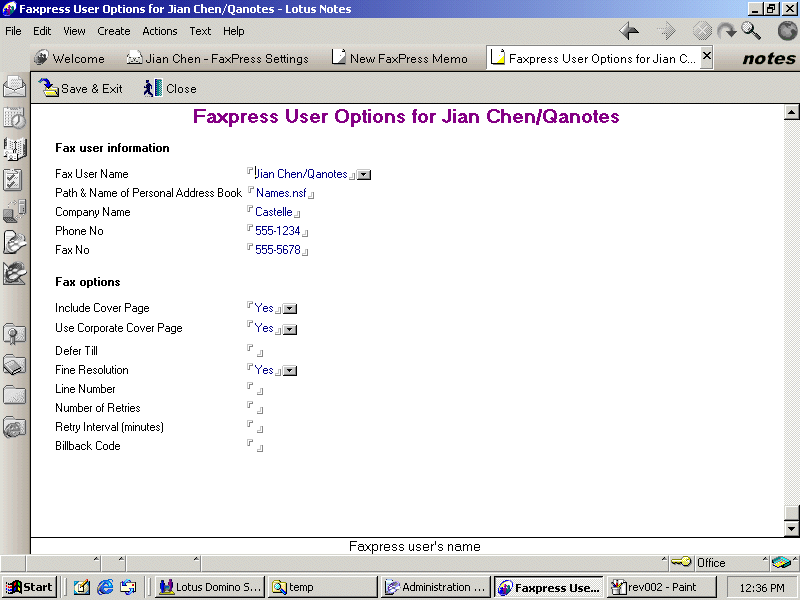
| 2. | The FaxPress User Options form provides a template allowing you to specify default user information and fax options. To select or enter the information, click the pull-down arrows. Fields left blank will use the default settings specified in the FaxPress server settings. See the FaxPress Administrator Guide and FaxPress User Guide for more information regarding the FaxPress server settings |
The information entered here in the FaxPress User Options template will be overridden by any information specified in the FaxPress-Select FaxPress To Options at Using the FaxPress Select Fax To Options Lotus Notes Environments
Fax user information
Fax User Name - confirm the default user name is correct.
Path & Name of Personal Address Book - select the path name for the personal address book .nsf file.
Company Name - enter the recipient’s company name. Company name can also be set in the Notes address book entry for the recipient.
Phone Number - enter the recipient company’s phone number. This is the recipient’s voice phone number (not the fax number) that will appear on the cover page. All parameters in the fax option template are designed for sending outgoing faxes to the recipient. Voice phone number can also be set in the Notes address book entry for the recipient.
Fax Number - enter your company’s fax number. This fax number appears in the recipient fax machine’s remote terminal ID display.
Fax options
Include Cover Page - select Yes or No to include or exclude cover pages with your faxes.
Use Corporate Cover Page - this setting is only functional if Yes is specified in the Include Cover Page option.
Cover Page Name - if No is specified in the Use Corporate Cover Page field, and Yes is specified in the Include Cover Page option, then use this field to specify a personal cover page.
Defer Til - leave this field blank. Use the Fax Options settings available with each new fax to specify a time to send.
Fine Resolution - select resolution or leave blank to use the default FaxPress server settings.
Line Number - Specify a line number. When FaxPress has more than one fax lines, this parameter is used to specify which fax line to use to send the outgoing fax. Normally, this parameter should be left blank and FaxPress will automatically search for an available fax line to send the fax. This parameter should be used only if the user is familiar with the FaxPress' line settings. Leave blank to use the default FaxPress server settings.
Number of Retries - Specify number of retries, or leave blank to use the default FaxPress server settings.
Retry Interval (minutes) - Specify retry interval, or leave blank to use the default FaxPress server settings.
Billback code - leave this field blank. Use the Fax Options settings available with each new fax to specify a Billback Code.
Sending a Notes mail message to a fax number requires that your message be addressed in the Fax To: field with a fax number rather than an email address.
Faxes may be addressed either by using:
| ■ | address book entries that have a fax number entered in the Office Fax field |
| ■ | the FaxPress Lotus Notes Gateway’s manual addressing options. |
Faxes may also be sent to user Groups specified in the Lotus Notes Address Book.
Text entered in the Subject box in a Notes mail message appears in the Notes section of the fax cover sheet. Text entered in the body of the mail message will appear as the body of the fax. Attached files will be converted to fax images and appended to the fax. Attachments are converted to fax format and added to the end of the fax in the order they are listed. To send the fax message to e-mail addresses in addition to fax addresses, click E-mail in the Action bar. When the Notes Mail Address dialog box opens, select one or more e-mail addresses.
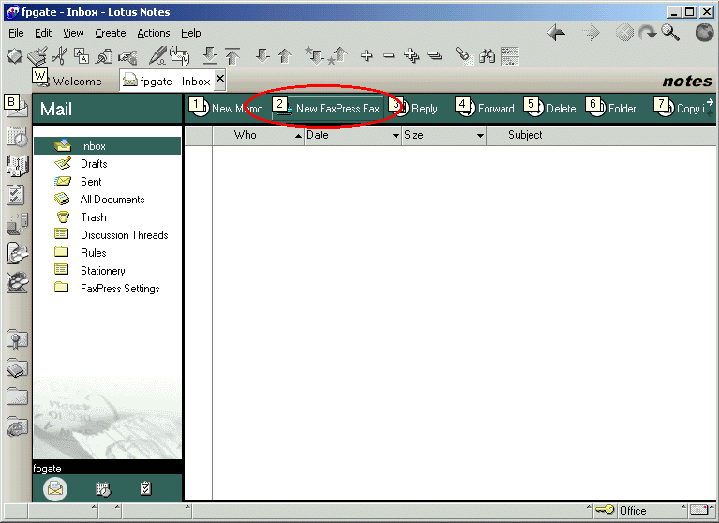
FaxPress/Notes Inbox and Memo Features
The Domino/FaxPress Integration Script installation creates and distributes two new fax-related Inbox and Memo features to all Notes mail users.
The Lotus Notes Inbox includes the New FaxPress Fax fax feature, the fax-enabled equivalent of the Lotus Notes New Memo feature.
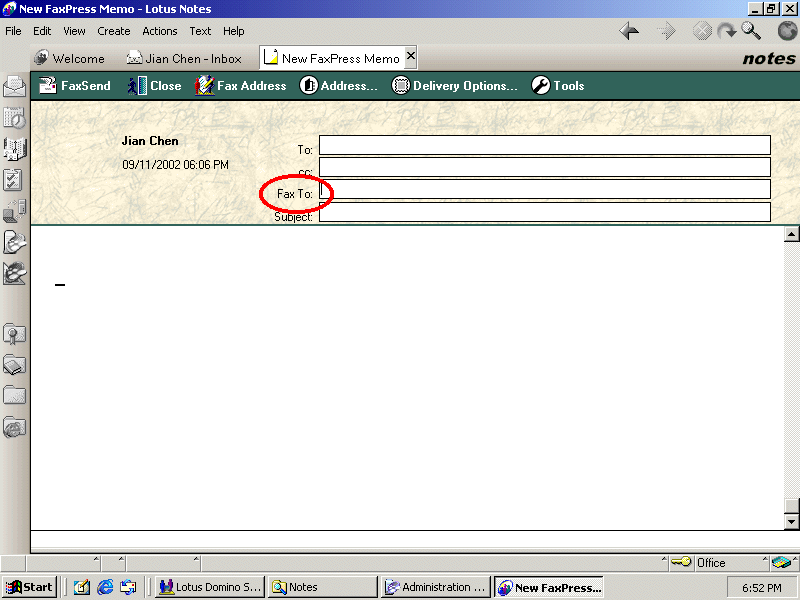
The fax-enabled FaxPress Memo - Lotus Notes includes a new FaxTo: field in addition to the standard Notes To: , cc:, and Subject fields.
Use the Fax To: field specifically for fax addressing.
Faxes may be addressed by using:
axes may be addressed by using:
| ■ | Lotus Notes Address Book entries. These entries must have the Office Fax fax number information field included. (See Sending Faxes Using Address Book Entries Lotus Notes Environments for more information.) FaxPress Lotus Notes manual addressing options. (See Manual Addressing with the Domino/FaxPress Integration Script Installed) |
Sending Faxes Using Address Book Entries
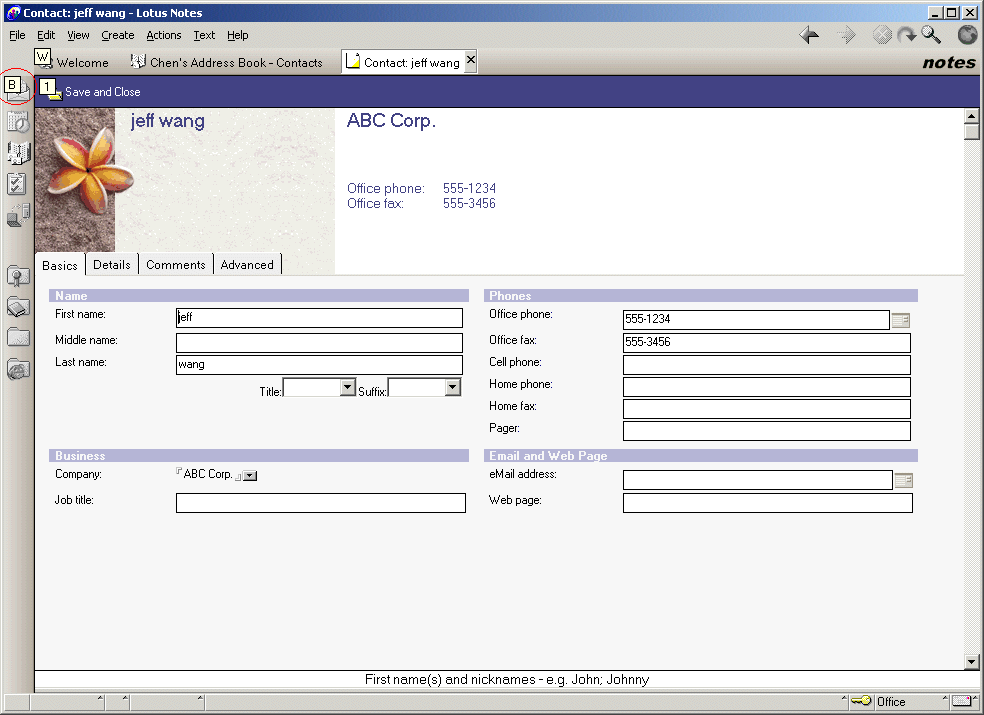
To create address book entries, select the Address Book icon on the left, then select Contacts>Add Contacts from your Lotus Notes inbox, then enter a fax number in the Office Fax field. The Home Fax field does not support faxing via the FaxPress.
Home Fax field entries cannot be used to send faxes via the FaxPress. Address Book entries used to send faxes via the Lotus Notes Gateway must contain an Office Fax number.
If the Company name or Office Phone Number fields are left blank in the Address Book entry, the FaxPress Fax Options may be used to provide that information for the fax cover page at the time the fax is composed. (See Using the FaxPress Select Fax To Options Lotus Notes Environmentsfor more information on using the FaxPress Fax Options.)
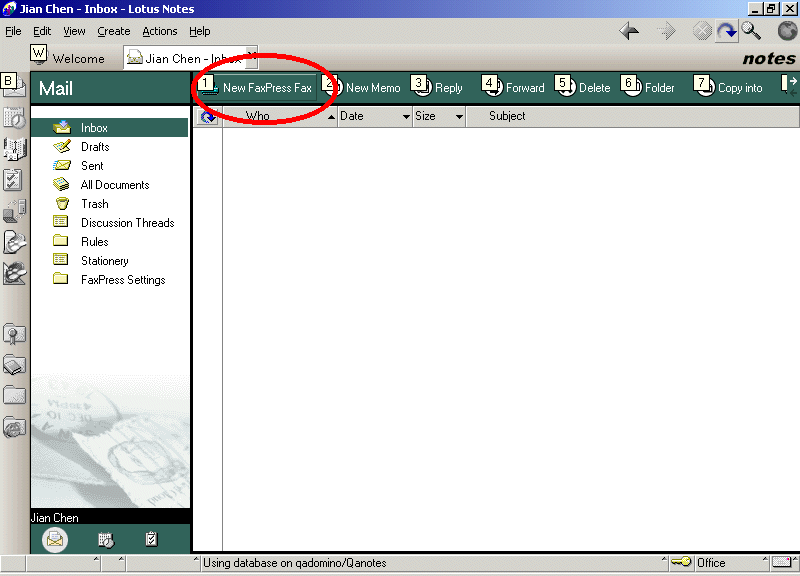
To use an address book entry to send a fax via the FaxPress Lotus Notes Gateway, follow these steps:
| 1. | Select Inbox, then select New FaxPress Fax. |
| 2. | Select Fax Address. |
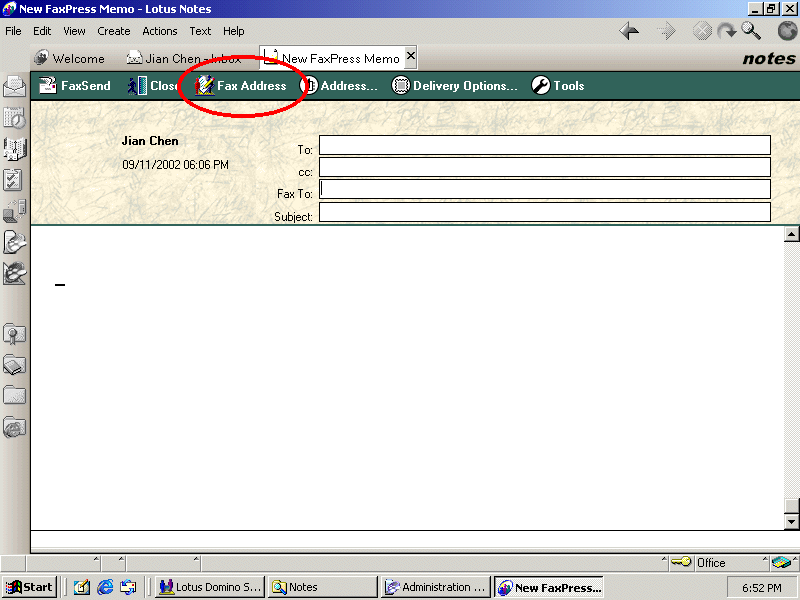
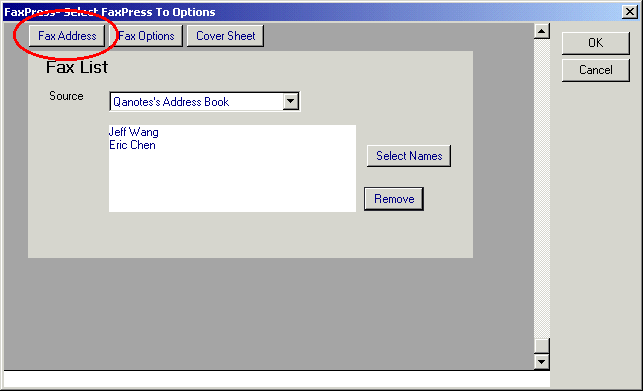
| 3. | Selecting Fax Address in the New FaxPress Memo - Lotus Notes window opens the FaxPress-Select FaxPress To Options window. Click the Fax Address button to bring up the Fax List window if it is not already open. The Fax List window lets you select one or more fax addresses from the Notes personal address book, Notes public address book or Domino directory. |
For a detailed explanation of features regarding the Fax Options and Cover Sheet options also included in the FaxPress Select To FaxPress Options, see Using the FaxPress Select Fax To Options Lotus Notes Environments.
| 4. | Select a phonebook from the Source pull-down list menu, then click the Select Names button. |
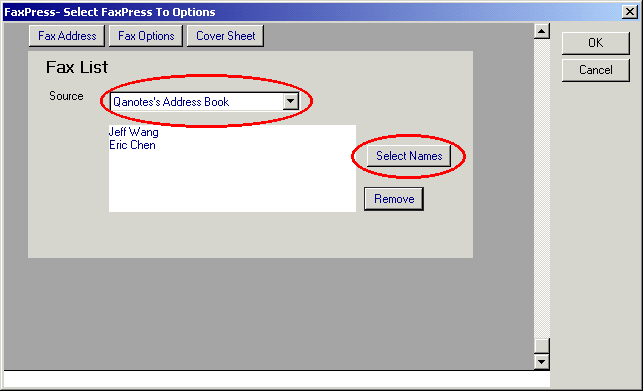
| 5. | Select a fax entry name or multiple entry names, then click OK to return to the FaxPress-Select FaxPress To Options window. |
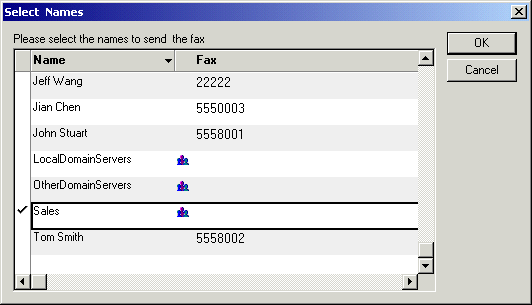
Any fax sent to a Group name selected from the Notes Address Book’s list - Sales in the example above - will be sent to all of the members in that group who have fax numbers entered in the Office Fax field of the address book entry.
Using the FaxPress Select Fax To Options
The FaxPress-Select FaxPress To Options window allows you to access your address books with the Fax Address option, customize fax sending settings with the Fax Options option, as well as specify cover sheet preferences using the Cover Sheet option.
This section specifically covers the features made available by the Fax Options and Cover Sheet options. The Fax Address’ addressing options are described in the Sending Faxes Using Address Book Entries. Take the following steps to set these options:
| 1. | Select Fax Address in the New FaxPress Memo - Lotus Notes window to open the FaxPress Select FaxPress To Options window. |
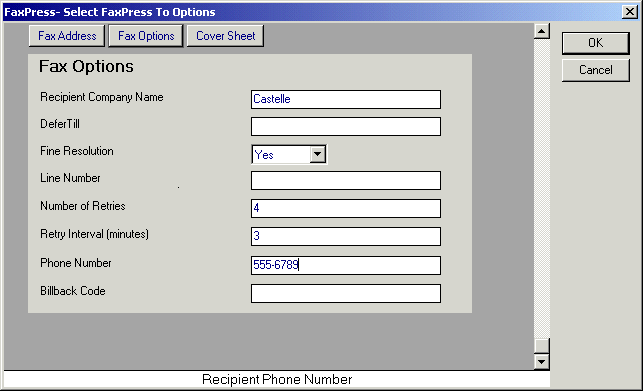
Recipient Company Name - enter the recipient’s company name. Company name can also be set in the Notes address book entry for the recipient.
Defer Til - specify a future time to send the fax (dd/mm/yyyy.)
Fine Resolution - select resolution preference or leave blank to use the default FaxPress server settings.
Line Number - Specify a line number. When FaxPress has more than one fax lines, this parameter is used to specify which fax line to use to send the outgoing fax. Normally, this parameter should be left blank and FaxPress will automatically search for an available fax line to send the fax. This parameter should be used only if the user is familiar with the FaxPress's line settings. Leave blank to use the default FaxPress server settings.
Number of Retries - Specify number of retries, or leave blank to use the default FaxPress server settings.
Retry Interval (minutes) - Specify retry interval, or leave blank to use the default FaxPress server settings.
Phone Number - enter the recipient company’s phone number. This is the recipient’s voice phone number (not the fax number) that will appear on the cover page. All parameters in the fax option template are designed for sending outgoing faxes to the recipient. Voice phone number can also be set in the Notes address book entry for the recipient.
Billback code - leave this field blank. Use the Fax Options settings available with each new fax to specify a Billback Code.
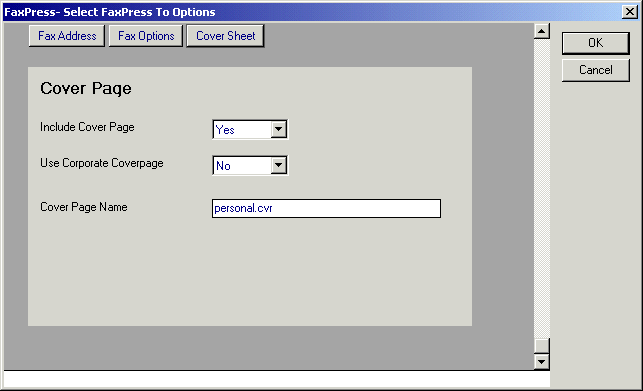
| 2. | Click the Cover Sheet button. The Cover Page Name field will display the cover page selected in the Fax Options’ Cover Page Name field. See Click OK to return to your message. |
| 3. | Complete the Subject line and type the body of the mail message. Text entered in the Subject box in the Notes mail message will appear in the Notes section of the fax cover sheet. Text entered in the body of the mail message will appear as the body of the fax. Attached files will be converted to fax images and appended to the fax. Attachments are converted to fax format and added to the end of the fax in the order listed. |
To send a fax message to e-mail addresses in addition to fax addresses, click E-mail in the Actions menu. When the Notes Mail Address dialog box opens, select one or more e-mail addresses.
Manual Addressing with the Domino/FaxPress Integration Script Installed
To send a fax without adding the recipient to one of your address books, use the FaxPress Lotus Notes Gateway manual addressing option. The manual addressing format described in this section applies only if the Domino/FaxPress Integration Script is installed. See Manual Addressing with the Domino/FaxPress Integration Script Installed Lotus Notes Environmentsfor the manual addressing options provided if the Domino/FaxPress Integration Script is not installed.
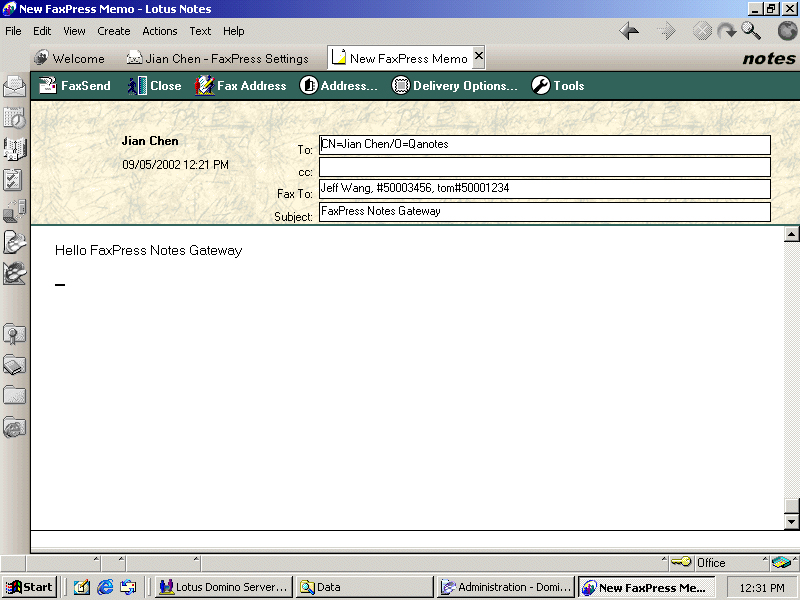
To send faxes using the FaxPress manual addressing format, open New FaxPress Fax and enter recipient's fax address string in the Fax to: field. The fax address string format is defined as follows:
Recipient-name#Recipient-fax-number
e.g. e.e. cummings#408-852-8704
No fax job options are allowed in the fax address string. Fax job options, provided by the Domino/FaxPress Integration Script installation, are specified using FaxPress Options button in the tool bar after clicking on Fax Address. (See Using the FaxPress Select Fax To Options Lotus Notes Environmentsfor more information.)
Notice in the Figure below that fax messages may be sent to both fax and email recipients simultaneously, as well as recipients with addresses entered manually or via your address book.
Sending Faxes without the Integration Script
Without the Domino/FaxPress Integration script installed on the Domino Server, the New FaxPress Fax button will not appear on the Notes client function bar. Notes clients can, however, still send faxes via the Gateway by manually addressing faxes according to the Notes Gateway’s email address string.
After FaxPress Lotus Notes Gateway has been installed and the gateway’s email account has been created, the Notes clients can directly send emails with attachments to the gateway’s email account. The gateway then polls this email account and sends all outgoing emails from that account as faxes via the FaxPress.
Manual Addressing without the Domino/ FaxPress Integration Script Installed
Using the email address string outlined here to address faxes allows users to include cover page information (i.e., the recipient’s name, company name, voice phone number, etc.), dialing instructions (i.e., PBX password), and FaxPress information (i.e., bill back code) according to key codes and characters set off by brackets { }.
This manual addressing format must be used to allow the iNotes Web Access Mail template to send faxes through the FaxPress.
The address string format is defined as followed:
Recipient-name#Recipient-fax-number{Key-code=Values,…}<gateway-account@domain>
Examples:
Tom Smith#1234567{r=f}<fpgate@castelle.com>
Tom#1234567{c=y,r=f}<fpgate@castelle.com>
Where “fpgate” is the Lotus Notes Gateway’s email account defined in the domain.
The key codes and characters used for the FaxPress Lotus Notes Gateway are the same as those used for the FaxPress SMTP Gateway.
|
FaxPress WebHelp
Last Updated: 9/12/2007
E-mail this page |
Castelle 855 Jarvis Drive, Suite 100 Morgan Hill, CA 95037 Toll-free 800.289.7555 Tel 408.852.8000 Fax 408.852.8100 |