Configuring the Email Gateway for Generic SMTP
Before starting the Email Gateway for Generic SMTP setup, make sure your network:
| ■ | has at least one FaxPress server installed and operational |
| ■ | is running an SMTP email server or agent (Lotus, GroupWise, Exchange) |
You’ll use the Email Gateway Configurator to select Email Gateway for Generic SMTP from among the other Gateway options, to map Faxpress and email users, set FaxPress server options, email and fax send options, file format options, fax scan period and incoming options, as well as trace tool options.
Required Gateway Configuration for Generic SMTP
For the Email Gateway for Generic SMTP to be operational, you’ll need to, at minimum, configure the Email Gateway Configurator:
| ■ | to use the Generic SMTP option. This is configured in the Email Gateway Configurator’s Protocol tab. |
| ■ | to map Exchange user names to Faxpress user names before fax messages can be sent and received successfully. This is configured in the Email Gateway Configurator’s User Map tab. |
| ■ | with your network’s SMTP server information and a return email address. This is configured in the Email Gateway Configurator’s Email to Fax tab. |
See Accessing the Email Gateway Configurator, for information on additional, optional Email Gateway Configurator parameters. Only those required for basic Gateway operation are covered here.
Setting the FaxPress Tab Settings for Generic SMTP
If you have just completed Installation of the Email Gateway for SMTP, as described i FaxPress SMTP Gateway Installation Procedure, the Email Gateway Configurator will have opened automatically.
If you need to open the Email Gateway Configurator, select Start>Programs>FaxPress>Add On Products>SMTP Gateway>FaxPress SMTP Gateway Configuration on the machine where you installed the SMTP Email Gateway.
By default, the Email Gateway Configurator opens with the FaxPress Tab selected.
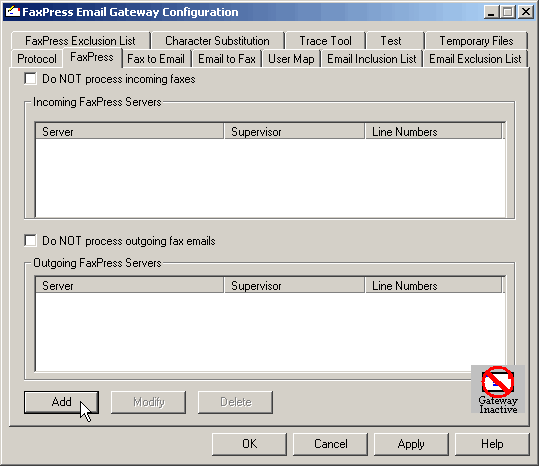
The Email Gateway configuration utility connects to the registry of the Email Gateway machine, allowing you to update the registry settings by clicking Apply. The symbol in the lower right corner lets you know whether or not the Email Gateway is currently running.
|
|
Running |
|
|
Not Running |
If the Email Gateway is running, the values that you save take effect immediately.
If the Email Gateway is not running, the saved values are used the next time the Email Gateway is started.
If you are using multiple Email Gateways, this procedure of adding/registering FaxPress servers specific to each Email Gateway will need to be repeated in each Email Gateway's configuration utility in order for load sharing to function correctly.
Load share the received faxes by dividing the incoming FaxPress servers list between the multiple Email Gateways. That is, if you have four FaxPress servers and two Email Gateways, add two FaxPresses to the incoming FaxPress list of one Email Gateway, and the other two FaxPresses to incoming list of the other Email Gateway.
Follow these steps to add FaxPress servers to use with the Exchange Connector and Email Gateway:
| 1. | Select the FaxPress tab if it is not already selected, then click the Add button, ass shown in the Figure above. |
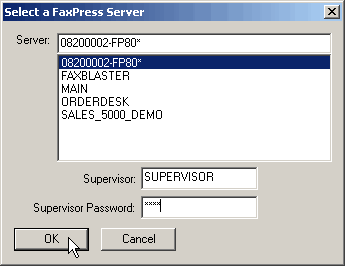
| 2. | The Select a FaxPress Server window requires you to select the intended FaxPress server, enter a supervisor login and password, then click OK. The Gateway uses this account to log onto the FaxPress. |
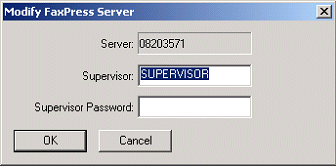
To modify a FaxPress server’s Administrator and/or Supervisor password, use the Modify button in the FaxPress tab of the FaxPress Email Gateway Configuration utility to bring up the Modify FaxPress Server window.
When you have added a server, the FaxPress tab will display it in both the Incoming and Outgoing FaxPress Servers lists.
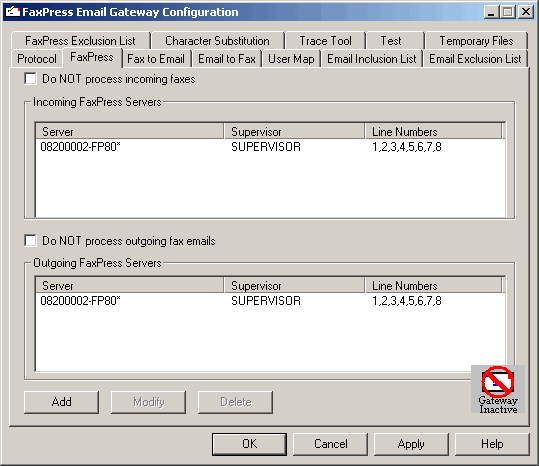
| 3. | If you want to use the gateway for outbound faxing only, select the server in the Incoming FaxPress Servers list and click the Do NOT process incoming faxes checkbox. If you want to use the gateway for inbound faxing only, select the server in the Outgoing FaxPress Servers list and click the Do NOT process outgoing faxes checkbox. |
| 4. | When you have added the FaxPress server or servers you want, click the Protocol tab to continue your gateway configuration. |
Setting the Protocol Options for Generic SMTP
In the Protocol Tab of the Email Gateway Configurator, you can select the protocol for your Gateway. Take these steps.
| 1. | Select the Generic SMTP radio button. |
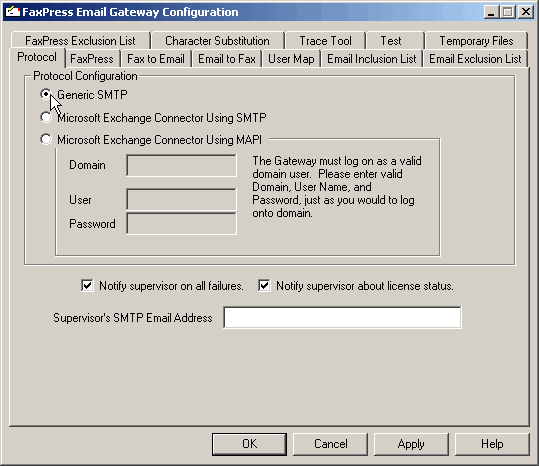
| 2. | In the Supervisor’s SMTP Email Address field, enter the email address of a supervisor-privileged user or Supervisor. The Gateway will email all notifications to this address. |
| 3. | Uncheck either of the notification checkboxes if you do not want the supervisor to receive notices: |
Notify supervisor on all failures When this box is checked the Gateway will notify the supervisor of any failed faxes.
Notify supervisor about license status This is only applicable if you are evaluating the product. Select to enable the daily email sent to notify the supervisor the number of days left until the license expires.
| 4. | Click the User Map tab when you have made your Protocol and notification choices and entered the supervisor’s email address. |
Mapping FaxPress Users for Generic SMTP
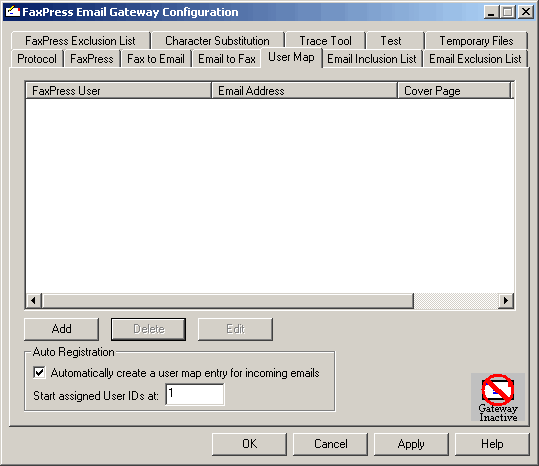
The User Map allows you to map your users’ SMTP mail account names to FaxPress user accounts, enabling integration of the two databases. Until User Mapping is established, the Email Gateway will not be able to route inbound faxes to email users. All inbound faxes will instead be delivered to the Unaddressed mailbox account.
You can map FaxPress users to your mail system users by:
| ■ | using the Active Directory Synchronizer |
| ■ | selecting the Auto registration option |
| ■ | manually adding a mail system user |
| ■ | selecting and adding users from a list |
Active Directory and User Mapping – Important
If you use Active Directory, and have already run the Faxpress Active Directory Synchronizer, the Email Gateway’s User Mapping will already be fully configured and user mapping will not need to be done manually. If the Active Directory Synchronizer will not be run, however, then the Auto-registration option in the User Map tab must be turned on.
Auto-registration must be turned Off when the Active Directory Synchronizer service is activated. Otherwise, duplicate users may be created.
Any Active Directory users not imported to the Faxpress by the Active Directory Synchronizer will need to be added to the Email Gateway's User Map manually or through Auto-registration.
In the Auto Registration section:
Automatically create a user map entry for incoming email Check this box if you want Gateway to automatically generate a new FaxPress account for each mail system user the first time the use,r sends a fax.
The new FaxPress account is generated from sender’s email address, and will be active on each of the configured outgoing FaxPress servers. The new FaxPress user and the user’s corresponding email address will also be added to the User Map. If the user already has a FaxPress account under the email address name, another FaxPress account is not generated.
Start assigned User IDs at Enter a value in this field only if you select the automatic user generation feature. When the Gateway automatically creates a FaxPress account for an email user, it starts at this ID and increments it by one until a unique ID is found, which is assigned to the new user.
For manually mapping a valid Exchange account to a FaxPress User Name, take these steps:
| 1. | Click the User Map tab’s Add button to bring up the FaxPress User to Email Address Mapping screen. |
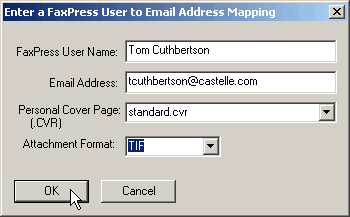
| 2. | Enter a FaxPress User Name and that user’s email address. |
| 3. | Select a cover page (it must be in the .cvr format) and a Fax attachment format (TIF, PDF, or DCX), and then click OK. The user will be listed in the User Map tab. |
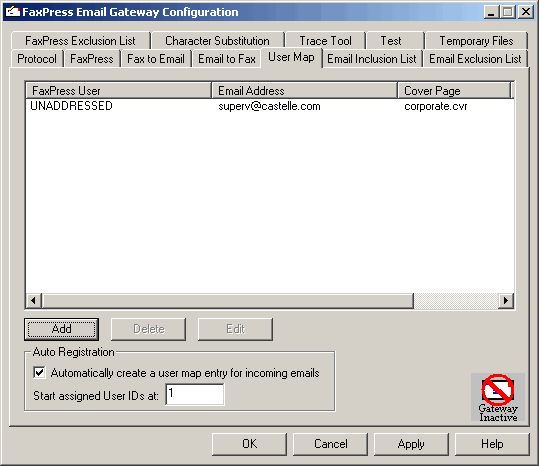
Mapping the FaxPress Unaddressed user account to an email address is recommended, since the Unaddressed mailbox receives all inbound faxes until either automatic routing or user mapping is established. An example is shown below.
| 4. | To save the mappings you have established, click Apply. |
| 5. | Click the Email to Fax tab when you have completed your manual mappings and set up automatic registration. |
Email to Fax Settings for Generic SMTP
The Email to Fax tab provides the parameters required for the Email Gateway for Generic SMTP to communicate with your SMTP mail server or agent, and allows you to modify the settings the Email Gateway for Generic SMTP uses in processing email.
The Email Gateway for Generic SMTP processes three kinds of email:
| ■ | Fax-addressed email sent by FaxPress users specifying that a fax is to be sent via FaxPress. |
| ■ | Email notifications sent by the Gateway to fax-addressed email senders informing them of the success or failure of the fax attempt. |
| ■ | Email notification sent by the Gateway to a Supervisor email address when there is a problem in the Gateway. |
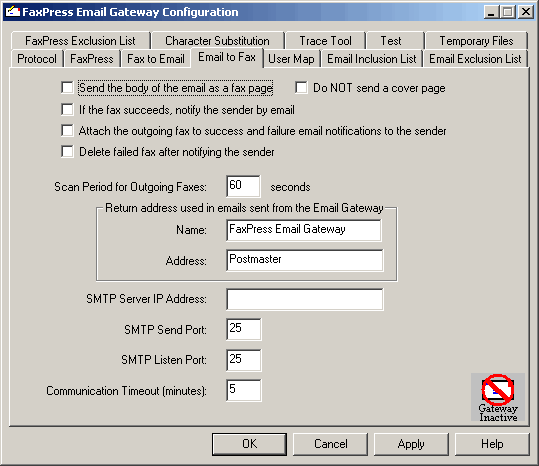
Use the checkboxes and fields in this tab to configure how you send faxes via the Email Gateway.
Send the body of the email as a fax page – check this box if you want the Gateway to send the body text in the received email on the cover page of the outgoing fax. If the email body text is greater than 960 characters (16 lines), the text will be included as a separate fax page and not included on the cover page of the fax.
Do NOT send a cover page - select this option to send only the body of the fax without a cover page.
If the fax succeeds, notify the sender by email – the Gateway will always send an email to the fax message sender if a fax fails. When a fax succeeds, on the other hand, you may not want to be notified. Check this box if you want the Gateway to send an email to the fax mail sender when their fax is successfully sent by FaxPress.
Attach the outgoing fax to the success and failure email notification to the sender - select this option to have all notifications include the outgoing fax.
Delete failed fax after notifying the sender - select this option to delete a failed outgoing fax after you are notified of the failure
Scan Period – the scan period is the interval the Email Gateway for Generic SMTP uses to check for fax-addressed email to send. The interval is set in seconds. If you set the Scan Period to 60 seconds, for example, every 60 seconds the Gateway will check to see if any fax-addressed email has been generated, and if so, will process and send them out.
Name – set the name that will be used in the return address for any email sent out by the Gateway. You may want to have a reference to the supervisor or supervisor who is in charge of FaxPress administration.
Address – set the return email address for email sent from the Email Gateway for Generic SMTP. A return email address is required for most mail servers to accept email.
IP Address of SMTP Mail Server – enter the computer name or TCP/IP address of the SMTP server the Email Gateway for Generic SMTP uses to send email. This should be the usual SMTP server used in your organization, the one you use to send all other email. Note that the Email Gateway for Generic SMTP does not replace your POP server; email clients on user desktops do not communicate directly with the Gateway. Rather, the Email Gateway for Generic SMTP sends email to your SMTP server; the email is then delivered to the user desktops as is any other incoming email.
SMTP Port – set the SMTP Port through which the Gateway will communicate. Leave the default value set to 25.
SMTP Listen Port – set the SMTP Port on which the Gateway will listen for incoming emails. The default value is 25 and should rarely have to be changed. If you do change the value from port 25, keep in mind that most SMTP servers only send email through port 25.
Communication Timeout – set the number of minutes the Gateway will wait before timing out when receiving or sending email and communication has stalled.
For more on configuration of the Email Gateway, see Appendix A, The Email Gateway Configurator.
Exchange 5.5 and the Email Gateway for Generic SMTP
To use the Email Gateway for Generic SMTP with Exchange 5.5, an SMTP domain entry for the Email Gateway for Generic SMTP must be created on the Exchange 5.5 server. This SMTP domain entry allows fax-specific SMTP traffic to move between your Exchange 5.5 server and the Gateway.
Creating an SMTP Domain will require the FaxPress’ IP address.
To create an SMTP domain for your fax traffic, follow these steps:
| 1. | Go to Start>Programs>Microsoft Exchange>Microsoft Exchange Administrator. |
| 2. | Expand your mail server’s Configuration branch, and select Connections. |
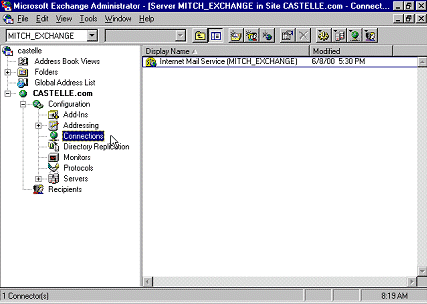
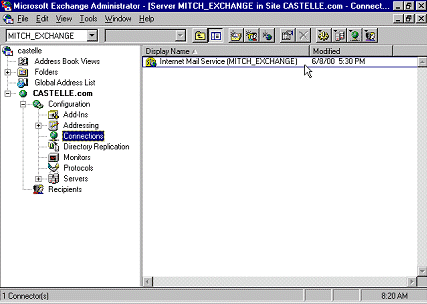
| 3. | Right-click on your Internet Mail Service and choose Properties. |
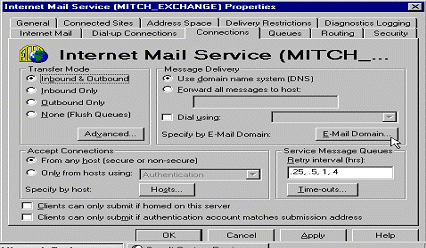
| 4. | In the Internet Mail Service Properties window, select the Connections tab. |
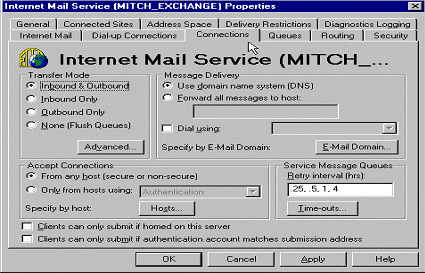
| 5. | Click the E-Mail Domain button. |
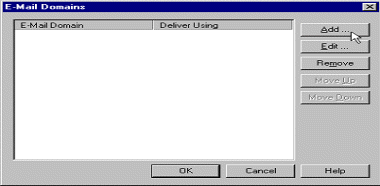
| 6. | In the Email Domains window, click the Add button. |
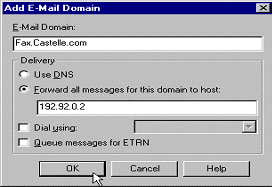
| 7. | In the Add E-Mail domain dialog box, enter the Email Gateway for Generic SMTP’s domain name. (The format fax.yourcompany.com is recommended, and is shown here.) Next, select the Forward all messages for this domain to host radio button, enter the FaxPress’s IP address, then click OK. |
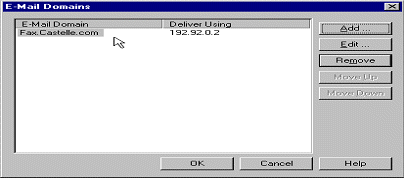
| 8. | The new entry appears in the Email Domains window. Click OK. |
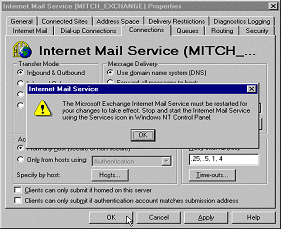
| 9. | In the Internet Mail Service window, click OK and reboot the SMTP Server. |
Creating an SMTP Connector on Exchange 2000/2003
Creating an SMTP Connector will require the FaxPress IP address.
To create a connector for your fax traffic, follow these steps:
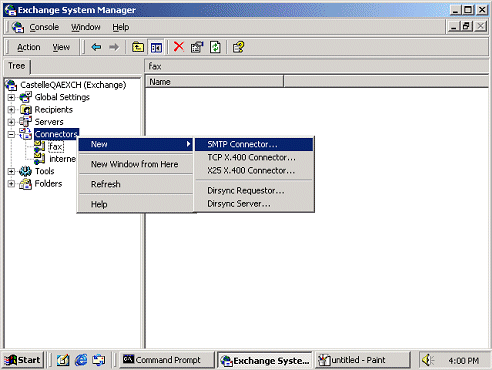
| 1. | Open the Exchange System Manager. (Start>Programs>Microsoft Exchange>System Manager) |
| 2. | In the Exchange System Manager, expand the Exchange Server's Connectors branch to view your site connectors. Right click on Connectors and select New>SMTP Connector. |
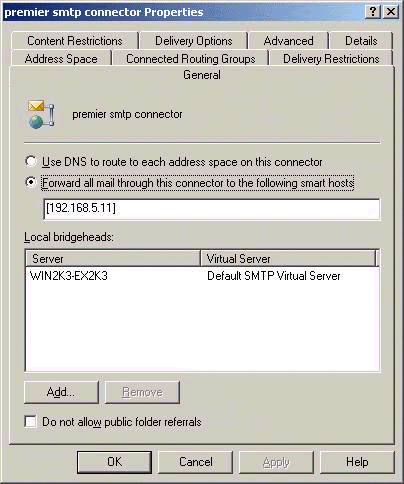
| 3. | In the Properties dialog box, with the General tab selected, enter a simple name such as “FaxPress SMTP” for the new SMTP Connector, select the Forward all mail through this connector to the following smart hosts radio button, enter the FaxPress’s IP address, then click Add to add a local bridgehead. |
Exchange 2000/2003 requires you to wrap [ ] around the IP address.
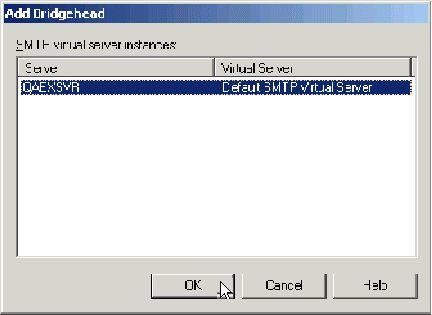
| 4. | In the Add Bridgehead screen, select a local bridgehead. Click OK. |
| 5. | Select the Address Space tab. You must modify the default settings by selecting the Routing group radio button, and checking the Allow messages to be relayed to these domains option. Click Add |
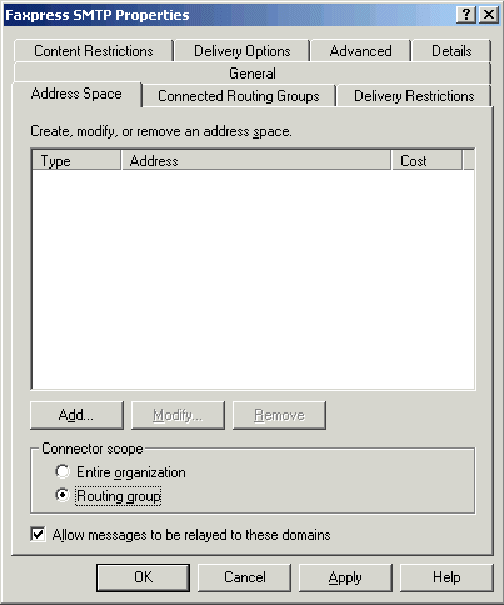
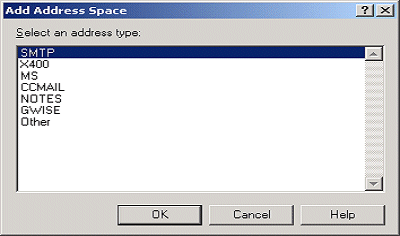
| 6. | In the Add Address Space window, select the SMTP address type and click OK. Address spacing information determines the way Exchange clients will address messages to the Gateway. |
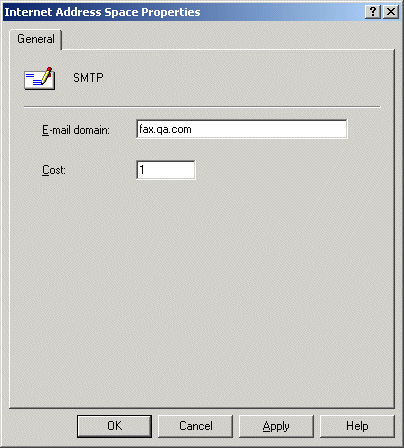
| 7. | In the Internet Address Space Properties window, enter the email domain your users will use to send faxes. Again, keep this name simple, e.g. “fax.qa.com” Click OK to apply changes and return to the Address Space tab. |
| 8. | In the Address Space tab, confirm again that the Routing group radio button is selected, and the Allow messages to be relayed to these domains option is checked. |
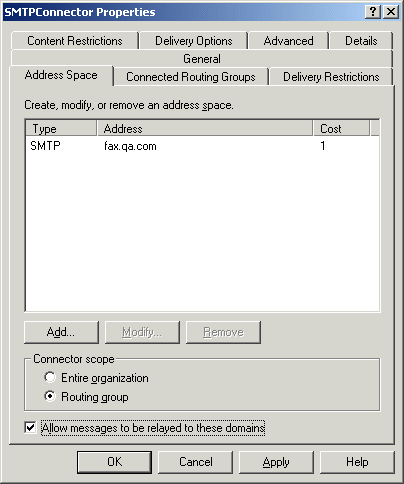
| 9. | Click OK. Your Exchange 2000/2003 server is now ready to send faxes to the Email Gateway for Generic SMTP. |
| 10. | To confirm the SMTP connector setup was successful, open one of your Exchange or Outlook mail clients and create a new test message. Enter a recipient fax number ‘at’ the new email domain name you entered in step 7 above, i.e.: |
recipient_fax_number@email_domain_name.company domain name.com
The new connector address space name in the earlier sample setup is ‘fax.qa.com,’ so the address of the test fax might look like this:
5551234@fax.qa.com
Add some text and/or a document attachment and send. Verify the job reached the Email Gateway for Generic SMTP either by viewing the trace file on the Email Gateway for Generic SMTP or by using FaxPress to check the outgoing queue on the Faxpress server.
|
FaxPress WebHelp
Last Updated: 9/12/2007
E-mail this page |
Castelle 855 Jarvis Drive, Suite 100 Morgan Hill, CA 95037 Toll-free 800.289.7555 Tel 408.852.8000 Fax 408.852.8100 |