Creating Local Phone Books
 Other Related Topics...
Local Phone Books can contain either FaxPress Phone Books or Database Phone Books. You do not have to be login to a FaxPress server to create or manage or local phone books because they are stored and accessed from your local workstation.
Create Local FaxPress Phone Books
To create a FaxPress Phone Book:
|
1.
|
Open (Start>Programs>FaxPress>FaxPress) |
|
2.
|
Expand the branch and click on . |
Two folders will be visible: and .
|
3.
|
Right click on and select from the context menu. |
|
4.
|
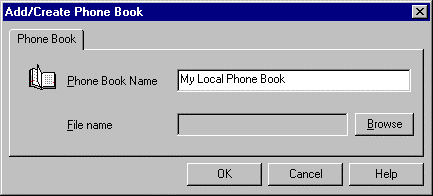
Enter the name you want to give the new phone book in the text box. |
|
5.
|
Click if you want to specify the path and filename of either a new phonebook or an existing FaxPress phonebook file in another directory that you want to attach. Otherwise the file will have a default name and be stored in the directory on your desktop. |
|
6.
|
Click to accept the values. A new folder will now be visible under the FaxPress Phone Books folder. You now either create a Group and add individual members or import a phonebook from a file. |
Create a Local Phone Book Group
|
1.
|
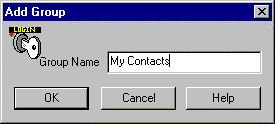
Right click on your new phonebook and select from the context menu. |
Group names can be used when sending faxes to broadcast your fax to any number of recipients. FaxPress handles this as a single fax and in fact only creates one raster file. This can significantly reduce the time necessary to process faxes.
|
2.
|
Enter a name for each group you want to define in the text box and click . |
|
3.
|
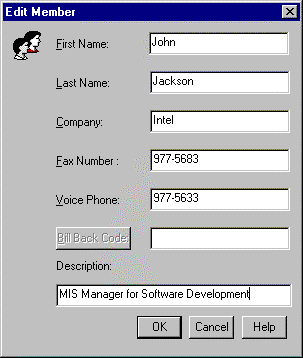
To add members to the group, right click on the Group name and select . The dialog box will be displayed. |
|
4.
|
Fill in the dialog box with the appropriate information. |
You can continue adding individual members, or you can import members into your phone book from a previously created phone book file. To import members continue to the next section, Import a Phone Book File.
Import a Phone Book File
As stated in the introduction to this chapter, you can import four types of phone book files:
|
■
|
Standard Comma Delimited Files (*.csv) |
|
■
|
Custom Comma Delimited Files (*.csv) |
|
■
|
ExportPH Files (*.*)— This is a FaxPress 3.x exported phone book |
To import a phone book file:
|
1.
|
Follow the procedure in Creating Phone Books to create a FaxPress Phone Book. But do not create a phone book group. |
|
2.
|
Right click on the phone book you have created and select and file format (i.e., CSV Default Format, CSV Custom Format, ExportPH, dBase) from the context menu. |
|
3.
|
If you are importing a CSV default format file, a dBase file, or a ExportPH file, an screen will provide you the means for locating the file. |
|
a.
|
If you are importing a dBase file, after you use the Open import file screen to locate your dBase file, the Convert dBase to Phone Book dialog box will be displayed. Use this dialog box to map the dBase fields (in to your FaxPress fields (in ). |
|
b.
|
Use the button to establish a link between the fields selected from the source dBase file and the target phone book (see above). The link is shown in the View list. Click on this button to remove selected item from the View list. |
|
c.
|
Click on the button to start the conversion process. |
|
4.
|
If you are importing a CSV custom format file, the dialog box will be displayed before the screen. |
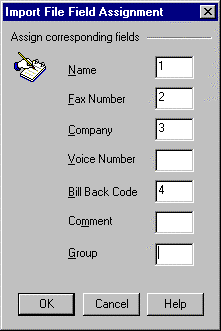
The default values in this dialog box are 1 through 7, respectively. Re-sequence the fields to correspond to your custom file. If you do not have one of the default fields in your custom file, leave the field blank. In the figure above, the custom file does not have fields for , or .
|
5.
|
After to have located the file, click to import the file. The phone book number will all be located in the folder (if not Group is defined in your imported file) or the Group name (defined in the import file) folder under your new . |
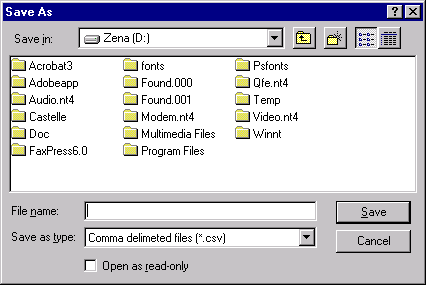
Export a Local FaxPress Phone Book
To export a phonebook, follow these steps:
|
2.
|
Expand the branch and click on and right click on the phone book you want to export. |
|
3.
|
Select from the context menu. The dialog box will be displayed. |
|
4.
|
Navigate to a directory, specify a name, and save the file. The file will be exported as a comma delimited file. |
ODBC Database Phone Book
FaxPress also supports ODBC based external phone books. This allows you to connect to existing databases and use them as phone books for faxing. ODBC Phone Book support allows the supervisor to:
|
■
|
Specify the external database to use as a FaxPress phone book |
|
■
|
Map FaxPress phone book fields and data base fields |
|
■
|
Create different views of the database by specifying filters |
The supervisor can create any number of corporate phone books. Each corporate phone book can connect to a different database and contain any number of views (filters) of that database. Views can be created, for example, to show a customer list in a specific state or country. ODBC Phone Book support provides a sophisticated yet intuitive user interface for the supervisor to create all those views.
Once the views are created, they become visible to all the users. The end user can use the Corporate phone books in exactly the same way they use the FaxPress native Corporate Phone Books. The end user can also create local ODBC Phone Books right from their desktop.
FaxPress ODBC phone books can work with any ODBC compliant database, including:
|
■
|
Any SQL compliant DBMS servers, such as Microsoft SQL server, Oracle, Informix etc. |
|
■
|
ISAM type databases such as: dBase, Excel, FoxPro, Microsoft Access database |
|
■
|
Personal & Corporate Cover Pages |
FaxPress allows users to create their own cover pages while supporting a globally accessible corporate cover page. FaxPress provides an easy-to-use cover page editor to facilitate the cover page creation process.
To access an external ODBC database, follow these steps:
|
2.
|
Expand the branch and click on |
|
3.
|
Right click on and select from the context menu. |
|
4.
|
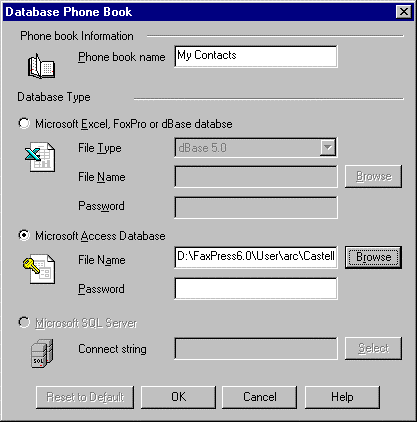
The dialog box is displayed. You can create a new phone book, give it a name and select the type and location of the database from this screen. |
The location must be specified using a UNC (Universal Naming Convention) path. A UNC path describes the location of a volume, directory, or file. The format for a UNC path is \\computername\sharedfolder\resource.
|
5.
|
To connect to either an Microsoft Access database or an Excel, FoxPro or dBase database, enter or browse for a file name and path. If the database file is password protected, you need to provide this password. |
The supported ISAM file formats are:
|
■
|
dBase versions III, IV, or V |
|
■
|
Excel versions 3.0, 4.0, 5.0 and 8.0 |
|
■
|
FoxPro 2.0, 2.5, 3.0 and DBC |
|
6.
|
To connect to a DBMS server such as Microsoft SQL server, select an existing or create a new connection string. This is done by clicking the ‘select’ button. The local ODBC user interface comes up to allow you to select the “ODBC data source name”. For detailed instructions for navigating in your ODBC 32 Bit setup program, refer to the Reference section in this Guide. |
Create Phone Book Views
To use an external database as a phone book, you must first link to the specified database and then create associations or mapping between the database fields (or columns) and the Phone book elements. The process of creating phone book views facilitates the mapping process.
|
1.
|
Right click on the new database phone book and select from the context menu. |
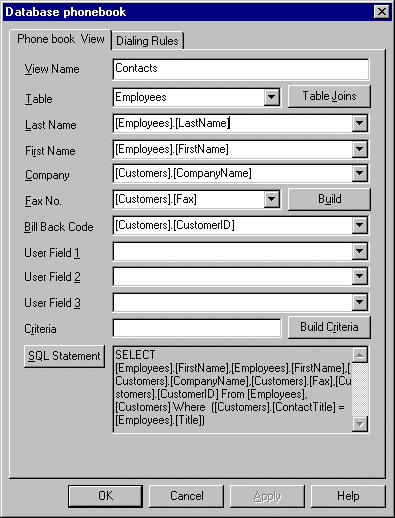
The dialog box will be displayed.

From the dialog box you can select any table and column in your phone book database and associate it with a phone book field.
If a field exists in the database, it must be used in one of the fields in the Database phonebooks dialog box. If a particular field is not to be used, delete its reference from the database, or else problems may occur.
|
2.
|
The tab will be activated by default. Use this tab to map the FaxPress phone book fields to the external phone book. The following FaxPress fields can be mapped into fields in the database phone book: |
|
■
|
The define tables in your database can be selected from the drop down list. |
|
■
|
and/or — To associate the fax recipient with the field or column in your table, select the appropriate column name from the drop down list. As in the example screen above, we have associated a column in the phone book with the column in the table. |
|
■
|
Refer to the Dialing Properties information in the FaxPress Administrator Guide for help with fax number format requirements. |
If your database table contains separate fields for country code, area code and number you will need to select those separately, by clicking the button to separately select each of those fields and put them together to generate the fax number.
|
■
|
Map this phone book field to the equivalent CompanyName column in your database table. This is an optional field. |
|
■
|
Map this phone book field to the equivalent BillBackCode column in your database table. This is an optional field. |
|
3.
|
To map the database table to your view, select a database tables in the scroll down list for . |
|
4.
|
Once you select the table, you will be able to select the table fields from the drop-down list boxes next to each of the FaxPress phone book fields. |
If your database table does not contain a separate fields for first and last name, just map one of them (either first or last name) to the full name, as shown above.
|
5.
|
You can define a filter on the database by clicking on the button. The Criteria dialog box will be displayed. |
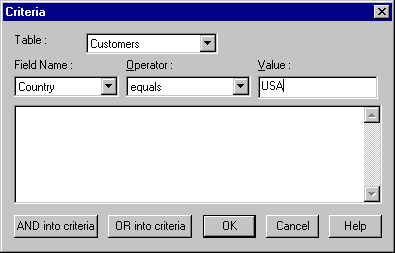
As an example, you can set the criteria for all supplier in the United States by selecting “Country” for , “equals” for , and “USA” for .
You can use either ‘Logical AND’ or ‘Logical OR’ to define the logical relationship between those conditions. The ‘Operator’ provides a rich variety of conditions such as: Begins with, Ends with, contains, does not contain etc.
|
6.
|
You can view the SQL statement that is generated as a result of the mapping and the criteria that you have set by clicking on the button. This is an informational field only. |
|
7.
|
Click when you are finished filling out the tab and select the tab. |
|
8.
|
To apply the dialing rules that have been defined in for every fax number in this view, click the box. |
|
9.
|
Click to finish creating your view. The new view will be located under the phone book folder. |
Create Table Joins
To access multiple tables from one phonebook view, you must include a new table in your view and define a join or an association between a column in one table with a column in the new table. You must define a join for each of the tables from which you want to include data for your phone book. At least one join has to be defined.
|
1.
|
Right click on any phone book view and select from the context menu. The tab will be activated. |
|
2.
|
Select the table you want to join by finding it in the scroll down list. In the above screen the table was added to the view. |
|
3.
|
Go to the FaxPress field name that you want to map to this , and find the new table field. In our example, the Employee.FirstName and Employee.LastName were mapped to the appropriate FaxPress fields. As soon as you enter a field from the new table the button will now be activated. |
|
4.
|
Click on the button. The Table Joins dialog box will be displayed. |

|
5.
|
Select the tables you want to join in and . |
|
6.
|
Select the field in Table 1 to join to the field in Table 2 in and . |
|
7.
|
Click the button. The view now includes data from two different tables. |
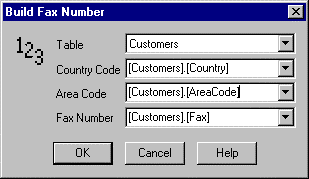
Build Fax Numbers
If your database table contains separate fields for country code, area code and number you will need to add each of those fields together to create the fax phone number.
|
1.
|
Right click on any phone book view and select from the context menu. The tab will be activated. |
|
2.
|
Click the button (to the right of ). The dialog box will be displayed. |
|
3.
|
To have FaxPress automatically build a fax number, you must map the following FaxPress fields to the fields in your database table. |
|
■
|
The table that contains the phone number fields |
|
■
|
The country code to include with the fax number |
|
■
|
The area code to include with the fax number. |
|
■
|
The base number to include with the fax number. |
FaxPress will now automatically generate the fax numbers.
FaxPress WebHelp
Last Updated: 9/12/2007
E-mail this page
|
Castelle
855 Jarvis Drive, Suite 100
Morgan Hill, CA 95037
Toll-free 800.289.7555
Tel 408.852.8000
Fax 408.852.8100
www.castelle.com
|