Creating a New Service
This tutorial explains how to create a new Service to use with CWS. We will create a new service called HelloWorld.
Outline
- Create OScript Project
- Generate Source Code
- Create .NET Service
- Build and Deploy .NET Service
- Test .NET Service
- Create Java Service
- Run Full Build
- Source Code
- References
Create OScript Project
The first thing we need is a new OScript project in Eclipse to work with.
-
Open Eclipse and make sure you are using the OScript perspective.
-
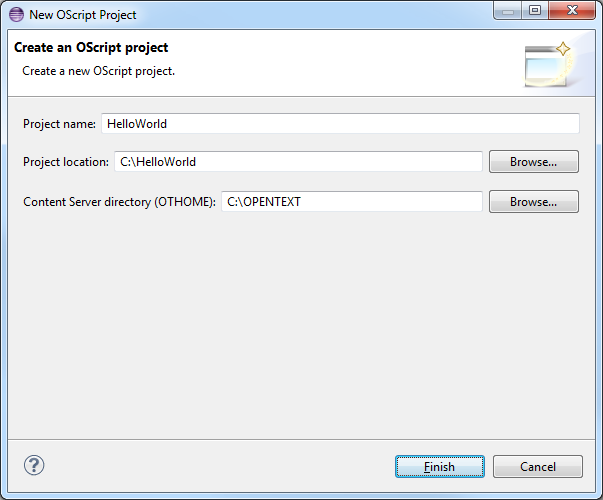
Open the File menu and select New → OScript Project.
- Enter
HelloWorldfor the Project name. - Enter
C:\HelloWorldfor the Project location. - Enter
C:\OPENTEXTfor the Content Server directory (OTHOME).
- Enter
-
Select Finish.
Create a New OScript Module
Next, we will create a new OScript Module for our service.
-
Open the File menu and select New → Other (Ctrl + N).
-
Select Module from the OScript folder and select Next.
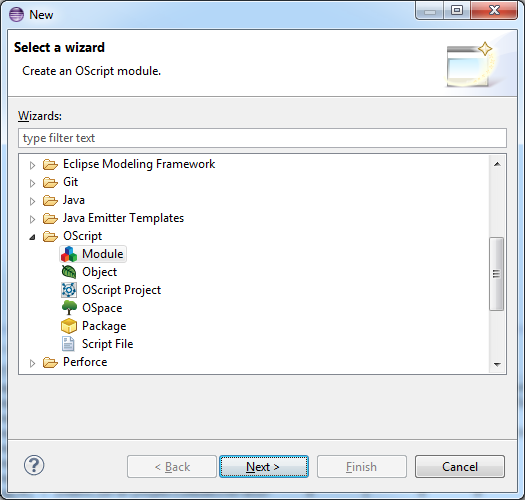
-
Enter
HelloWorldfor the OSpace Name and select Finish.
-
Restart Content Server and install the module.
Create a Service Object
Next we will create a Service object.
-
Create a new package by right-clicking the HELLOWOLRD OSpace in the OScript Explorer view and select New Package. Enter
Servicefor the Package Name and select Finish.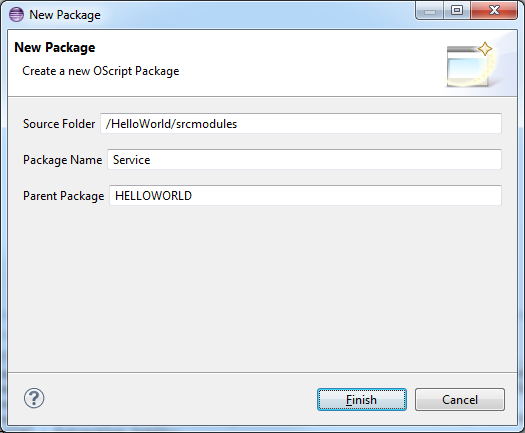
-
Create a new object in the Service package by right-clicking the Service package and select New Object. Enter
HelloWorldfor the Object name,SERVICE::Servicefor the Parent object and select Finish.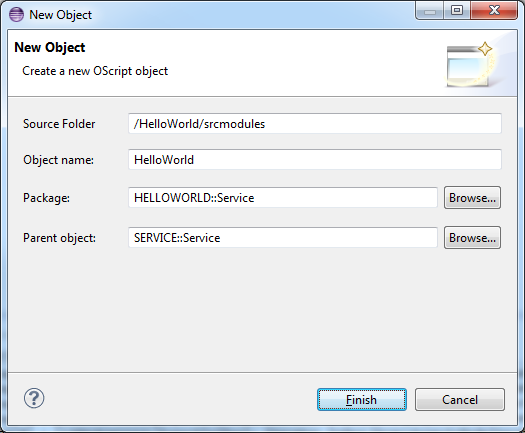
-
Open the HelloWorld.os file and add the following code:
package HELLOWORLD::Service

public Object HelloWorld inherits SERVICE::Service

	override Boolean fEnabled = TRUE
	override String fDescription = "A simple Hello World service."
	override String fNamespace = "Hello"


	public function Assoc GetMessage()

		return .SetReturnValue( "Hello World!" )

	end

end
Create a ServiceMethod Object
Next we will create the ServiceMethod object.
-
Create a new package by right-clicking the HELLOWORLD OSpace in the OScript Explorer view and select New Package. Enter
ServiceMethodfor the Package Name and select Finish.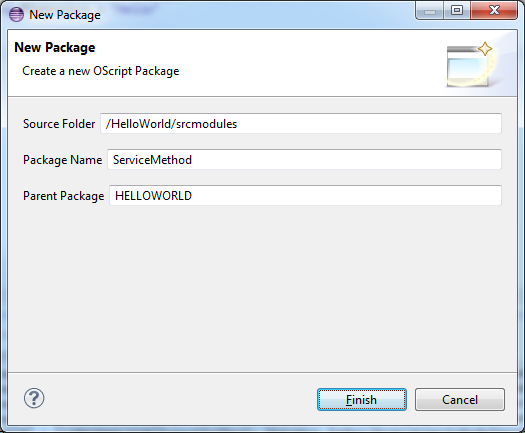
-
Create a new object in the ServiceMethod package by right-clicking the ServiceMethod package and select New Object. Enter
GetMessagefor the Object name,SERVICE::ServiceMethodfor the Parent object and select Finish.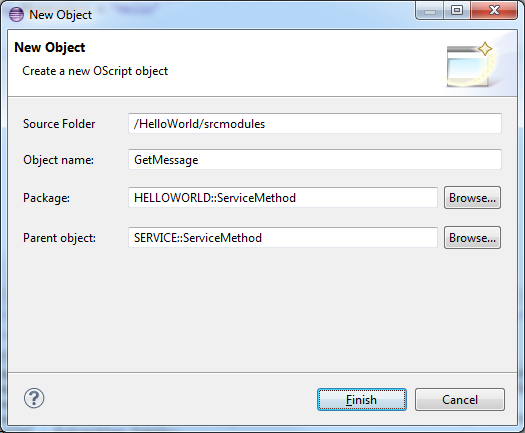
-
Open the GetMessage.os file and add the following code:
package HELLOWORLD::ServiceMethod

public Object GetMessage inherits SERVICE::ServiceMethod

	override Boolean fEnabled = TRUE
	override String serviceName = "HelloWorld"
	override String description = "Gets the Hello World message."
	override List parameters = Undefined
	override Assoc returnDef = Assoc{
		"typeName" : "String",
		"nativeType" : StringType,
		"description" : "Gets the hello world message.",
		"namespace" : Undefined,
		"isSDO" : FALSE,
		"isArray" : FALSE,
		"isEnum" : FALSE
	}
	override Assoc faultCodes = Undefined
	override Boolean requiresServiceToken = TRUE
	override String sinceVersion = Undefined
	override String deprecatedReason = Undefined

end
Generate Source Code
Next we need to generate the C# and Java source code using the generateSourceAPI.e script. To run the script, first make the following changes:
- Change the
srcOutputDirvariable to the directory you want to create the generated source files in, ie.C:/HelloWorld. - Change the
cSharpDirvariable to the sub-directory of yoursrcOutputDirthat you want to create the C# source files in, ie.cs_src/services. - Change the
javaDirvariable to the sub-directory of yoursrcOutputDirthat you want to create the Java source files in, ie.java_src/services. - Change the
servicesvariable to{ "HelloWorld" }. If you set this variable toUndefinedthen the script will generate the source for all services in your system.
After these changes are made you can run the script and it will generate the Java and C# code for your service.
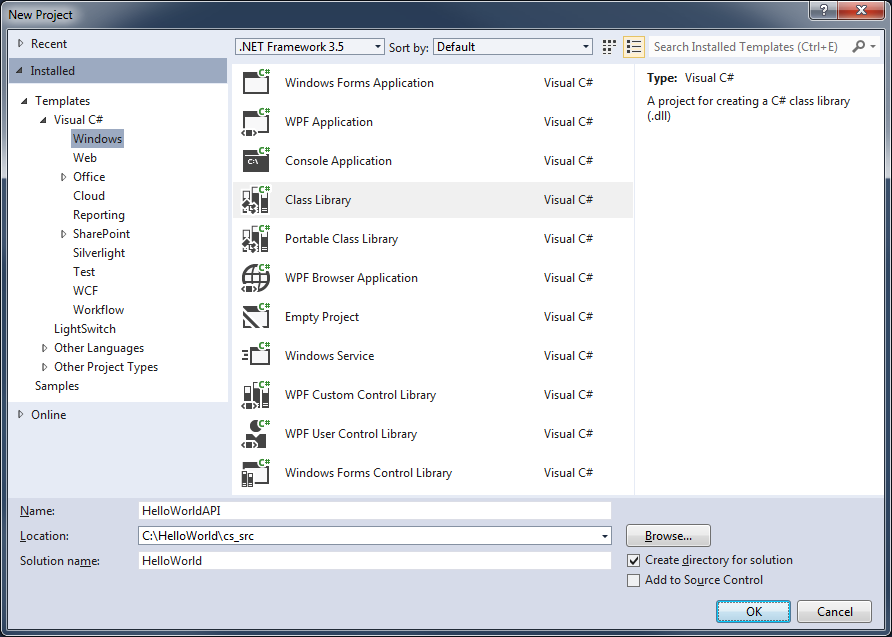
Create .NET Service
-
Open Visual Studio.
-
Open the File menu and select New → Project (Shift + Ctrl + N).
- Select .NET Framework 3.5 as the .NET Target Framework.
- Select Class Library as the Project Type.
- Enter
HelloWorldfor the Solution name (you need to make sure the Create directory for solution option is selected). - Enter
HelloWorldAPIfor the project Name. - Enter
C:\HelloWorld\cs_srcfor the project Location.
-
Select OK.
-
Delete the generated Class1.cs file.
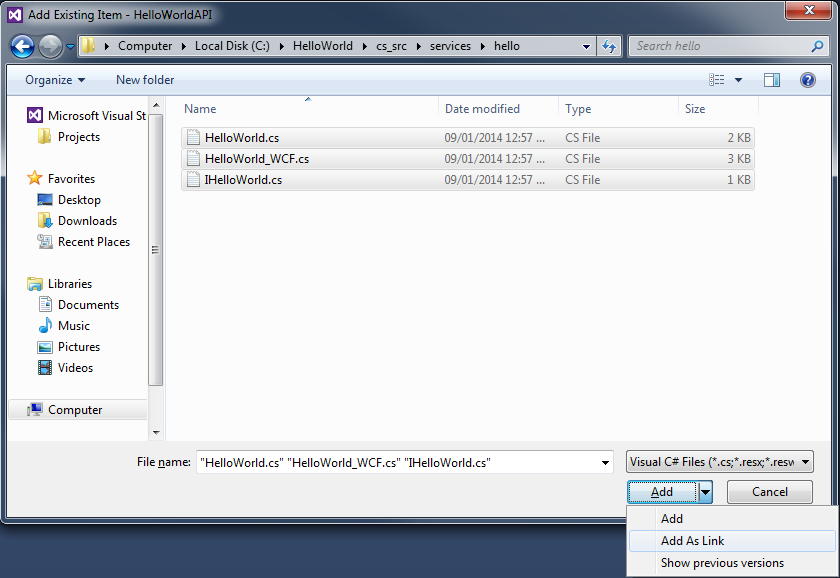
-
Open the Project menu and select Add Existing Item... (Shift + Alt + A).
- Browse to the C:\HelloWorld\cs_src\services\hello directory and select all the .cs files.
- Click the arrow beside the Add button and select Add As Link.
-
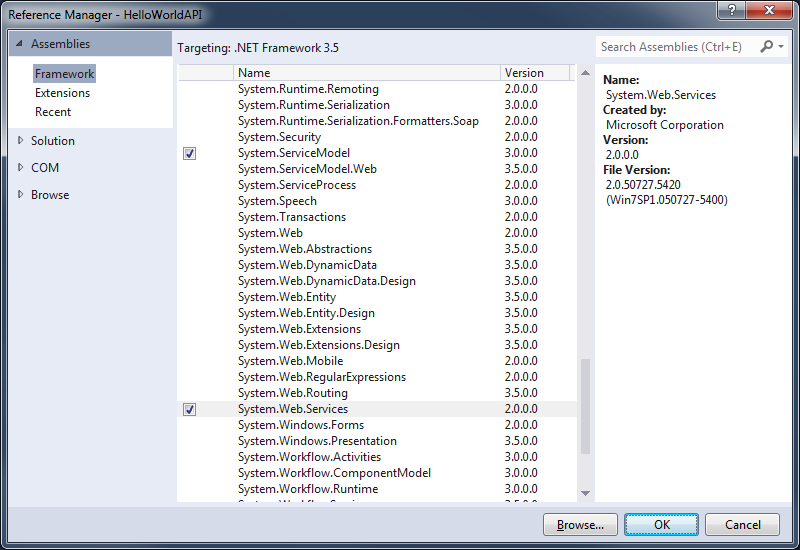
Add references to the following files provided:
- LapiService.dll
- OpenText.ContentServer.API.dll
- OpenText.Livelink.Service.Core.dll

NOTE
These DLL files can also be found here:
OTHOME/webservices/dotnet/cws/bin
-
Add references to the following assemblies:
- System.ServiceModel
- System.Web.Services
-
Open the Project menu and select HelloWorldAPI Properties.
- Change the Assembly name to
OpenText.Livelink.Service.Hello. - Change the Default namespace to
OpenText.Livelink.Service.Hello.

- Change the Assembly name to
Build and Deploy .NET Service
We can now build and deploy the .NET version of the HelloWorld service. Here is an ANT build.xml file to build the Visual Studio solution and copy the required files into a directory that can be used to host the services with IIS.
<?xml version="1.0"?>
<project default="build">

	<!-- Default build properties -->
	<property environment="env" />
	<property file="build.properties" />

	<target name="build" depends="compile.dotnet, deploy.dotnet" />

	<!-- Compiles the generated C# files -->
	<target name="compile.dotnet" description="Compiles the generated C# files.">

		<fail unless="env.DevEnvDir"
			message="The DevEnvDir environment variable is undefined; it must be defined by running %VS110COMNTOOLS%\vsvars32.bat." />

		<exec executable="devenv"
			dir="${src.dir.csharp}/${web.svc.csharp.sln}"
			failonerror="false"
			failifexecutionfails="true"
			resultproperty="compile.csharp.result">

			<arg line="${web.svc.csharp.sln}.sln /rebuild Release /out ${build.dir.dotnet}/devstudio-build.log" />
		</exec>

		<!-- Fail the build if the C# build returns anything other than 0 -->
		<condition property="fail.the.build">
			<not>
				<equals arg1="0" arg2="${compile.csharp.result}" />
			</not>
		</condition>

		<fail if="fail.the.build"
			message="Build result code: ${compile.csharp.result}. See ${build.dir.dotnet}/devstudio-build.log for any errors." />

	</target>

	<!-- Copies the required .NET files into a directory that can be used to create an IIS application. -->
	<target name="deploy.dotnet" depends="compile.dotnet"
		description="Copies the required .NET files into a directory that can be used to create an IIS application.">

		<mkdir dir="${deploy.dir.dotnet}" />
		<mkdir dir="${deploy.dir.dotnet}/bin" />

		<copy todir="${deploy.dir.dotnet}" flatten="true" failonerror="false">
			<fileset dir="${src.dir.csharp}/services" includes="**/*.svc, Web.config" />
		</copy>

		<copy todir="${deploy.dir.dotnet}/bin" failonerror="false">
			<fileset dir="${src.dir.csharp}/${web.svc.csharp.sln}/${web.svc.csharp.impl.proj}/bin/Release" includes="*.dll" />
		</copy>
	</target>

</project>
The corresponding build.properties file is shown here:
# Source Files
src.dir.csharp=${basedir}/cs_src

# Service Specific Items
web.svc.name=HelloWorld
web.svc.csharp.sln=${web.svc.name}
web.svc.csharp.impl.proj=${web.svc.name}API

# Output Directories
build.dir=${basedir}/build
build.dir.dotnet=${build.dir}/dotnet

# Deploy Directories
deploy.dir=${build.dir}/webservices
deploy.dir.dotnet=${deploy.dir}/dotnet/helloworld
Run the ANT build. Create an application in IIS and point it to the build/webservices/dotnet/helloworld directory. You should now have a working HelloWorld service for .NET.
Test .NET Service
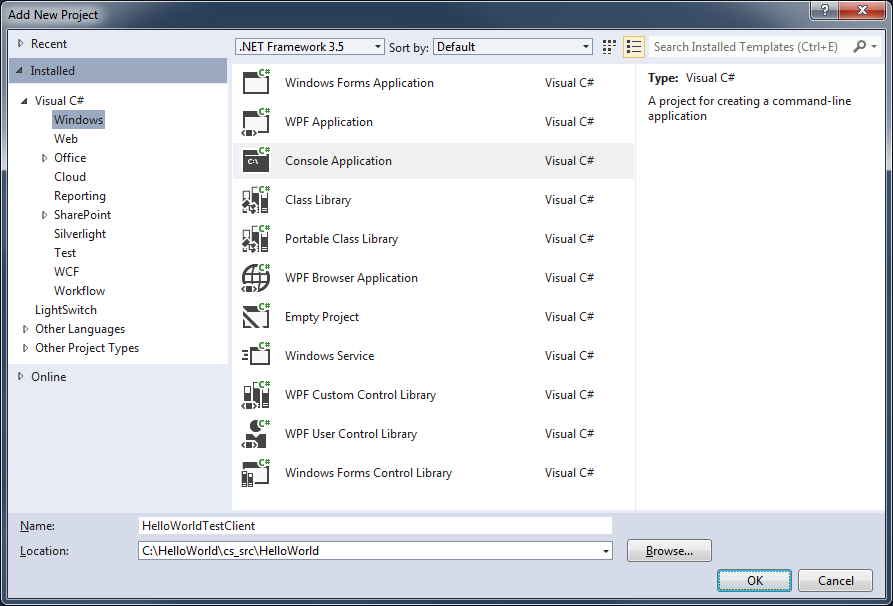
Next we will create a simple test client to test the service. We will simply just add a project to our existing HelloWorld Visual Studio solution.
-
Open the HelloWorld solution in Visual Studio.
-
Open File menu and select Add → New Project...
- Select Visual C# Console Application as the project Type.
- Enter
HelloWorldTestClientas the project Name. - Select OK.
-
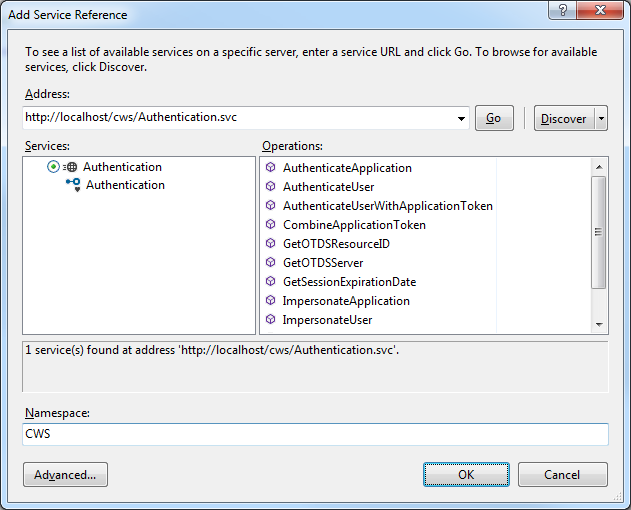
Add a service reference for CWS and point it to the CWS Authentication service and the HelloWorld serivce.
- Open the Project menu and select Add Service Reference....
- Enter the URL of the CWS Authentication service in the Address box and select Go.
- Enter
CWSas the namespace and select OK.
-
Open the Project menu and make sure the Show All Files option is selected.
In the Solution Explorer view, open the Service References → CWS → Reference.svcmap file.
Add a new
MetadataSourceelement for the HelloWorld service.... <MetadataSources> <MetadataSource Address="http://localhost/cws/Authentication.svc" Protocol="http" SourceId="1" /> <MetadataSource Address="http://localhost/helloworld/HelloWorld.svc" Protocol="http" SourceId="2" /> </MetadataSources> ...
-
In the Solution Explorer, select the CWS service reference under the Service References folder.
Open the Project menu and select Update Service Reference.
-
Modify the Program.cs file as follows and change the
usernameandpasswordvariables to use the credentials of a valid user on your system.using HelloWorldTestClient.CWS; using System; using System.ServiceModel; namespace HelloWorldTestClient { class Program { static void Main(string[] args) { // The user's credentials string username = "username"; string password = "password"; // Create the Authentication service client AuthenticationClient authClient = new AuthenticationClient(); // Store the authentication token string authToken = null; // Call the AuthenticateUser() method to get an authentication token try { Console.Write("Authenticating User..."); authToken = authClient.AuthenticateUser(username, password); Console.WriteLine("Success!\n"); } catch (FaultException e) { Console.WriteLine("Failed!"); Console.WriteLine("{0} : {1}\n", e.Code.Name, e.Message); return; } finally { // Always close the client authClient.Close(); } // Create the HelloWorld service client HelloWorldClient helloWorldClient = new HelloWorldClient(); // Create the OTAuthentication object and set the authentication token OTAuthentication otAuth = new OTAuthentication(); otAuth.AuthenticationToken = authToken; // Call the GetMessage() method try { Console.Write("Getting the message..."); string message = helloWorldClient.GetMessage(ref otAuth); Console.WriteLine("Success!\n"); Console.WriteLine("Message = {0}\n", message); } catch (FaultException e) { Console.WriteLine("Failed!"); Console.WriteLine("{0} : {1}\n", e.Code.Name, e.Message); return; } finally { // Always close the client helloWorldClient.Close(); } } } } -
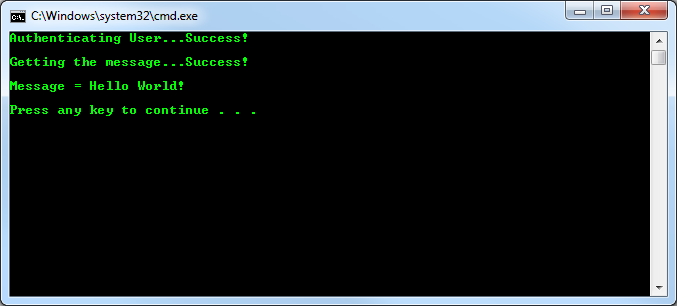
If everything is setup correctly you should eb able to successfully run the program.
Open the Debug menu and select Start Without Debugging (Ctrl+F5).
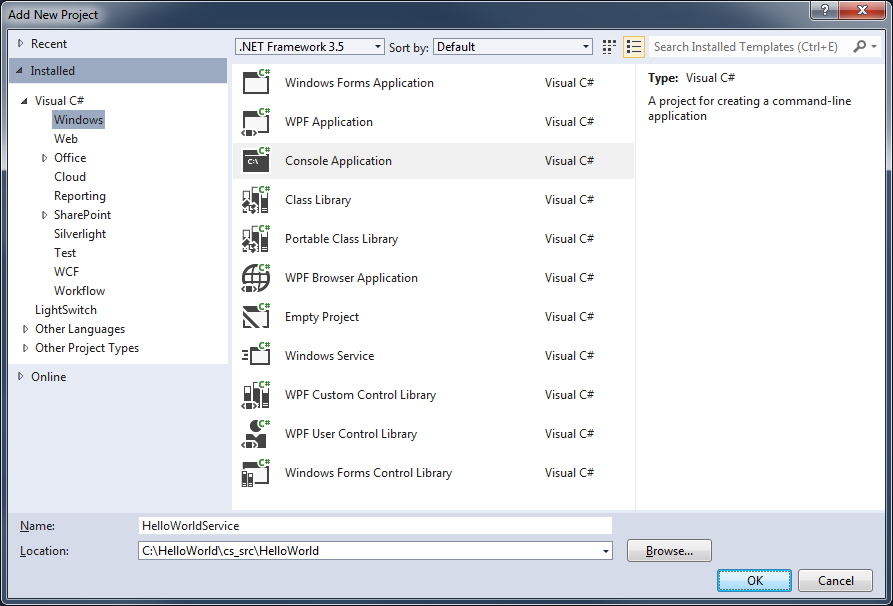
Create Java Service
First we will create a .NET project to generate the required WSDLs and XSDs for the service.
-
Open the HelloWorld solution in Visual Studio.
-
Open the File menu and select Add → New Project...
- Select .NET Framework 3.5 as the .NET Target Framework.
- Select Console Application as the project Type.
- Enter
HelloWorldServicefor the project Name.
Select OK.
-
Add a reference to the HelloWorldAPI project.
Open the Project menu and select Add Reference.
In the Solution → Projects tab select the HelloWorldAPI project and select OK.
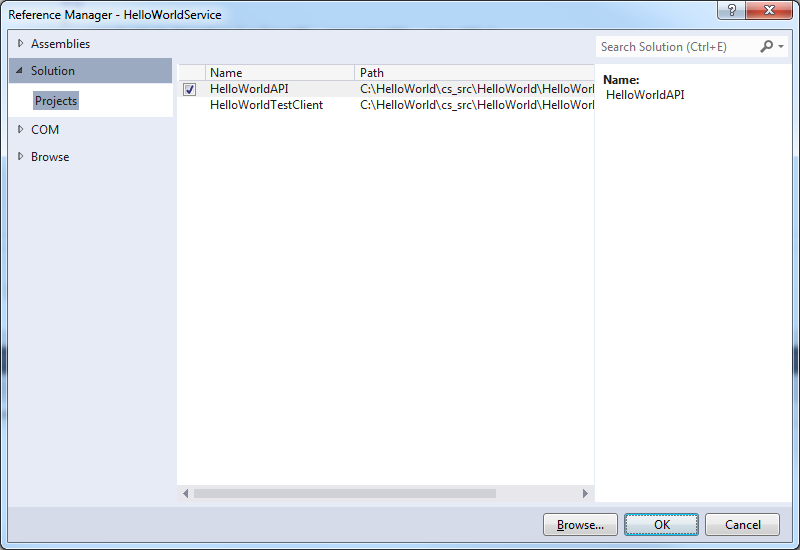
-
Add a reference to the OpenText.Livelink.Service.Core.dll file.
Open the Project menu and select Add Reference.
In the Solution → Projects tab select the HelloWorldAPI project and select OK.
-
Copy the generated Web.config file into the project and rename it to App.config.
The Web.config file is located in the cs_src/services directory.
-
Open the Program.cs file and replace the contents with the following:
using OpenText.Livelink.Service.Core; using System; using System.IO; namespace HelloWorldService { class Program { static void Main(string[] args) { string baseURL; bool generateWSDL = false; DirectoryInfo outputDir = null; if (args.Length == 1) { baseURL = args[0]; } else if (args.Length == 2) { baseURL = args[0]; outputDir = new DirectoryInfo(args[1]); generateWSDL = true; if (!outputDir.Exists) { try { outputDir.Create(); } catch (Exception ex) { Console.WriteLine("Unable to create {0}. ErrMsg: {1}", outputDir, ex.Message); return; } } } else { Console.WriteLine("Usage: WcfServiceHost baseServiceURL [wsdlOutputDir]"); return; } SelfHostingServer serviceHost = new SelfHostingServer(); try { serviceHost.StartService(baseURL, generateWSDL, outputDir); } catch (Exception ex) { Console.WriteLine("Error starting services: {0}", ex.Message); return; } if (!generateWSDL) { Console.WriteLine("Press any key to stop all services..."); Console.ReadKey(); } serviceHost.StopService(); } } } -
Open the Project menu and select HelloWorldService Properties.
Select the Debug tab and under the Start Options → Command line arguments enter
http://localhost:83/helloworld.Run the program and you will have your HelloWorld service available at http://localhost:83/helloworld/HelloWorld.svc.
If you add another argument to the Command line arguments pointing to a folder on your system running the program will generate the WSDLs and XSDs needed for creating the Java version of the service. This is shown in the build script below.
Run Full Build
We are now ready to build everything using the complete version of the ANT build.xml file shown below:
<?xml version="1.0"?>
<project default="build">

	<description>
	Sample ANT build project for the HelloWorld service.

	Builds the API classes and creates a .NET and a Java version of the web service.
	</description>

	<!-- Default build properties -->
	<property environment="env" />
	<property file="build.properties" />

	<path id="classpath">
		<pathelement location="${basedir}/lib/java/commons-logging-1.1.jar" />
		<pathelement location="${basedir}/lib/java/csapi.jar" />
		<pathelement location="${basedir}/lib/java/service-api-10.5.0.jar" />
		<pathelement location="${basedir}/lib/java/service-jaxws-10.5.0.jar" />
	</path>

	<path id="jaxws.classpath">
		<pathelement location="${basedir}/lib/java/jaxws-tools.jar" />
	</path>

	<taskdef name="wsgen" classname="com.sun.tools.ws.ant.WsGen">
		<classpath refid="jaxws.classpath" />
	</taskdef>

	<!-- Full Build. -->
	<target name="build"
		depends="compile.dotnet, deploy.dotnet, compile.java, deploy.java"
		description="Full Build." />


	<!-- Deletes the entire build directory. -->
	<target name="clean"
		description="Deletes the entire build directory.">

		<delete dir="${build.dir}" />
	</target>


	<!-- Compiles the generated C# files and generate the WSDL for Java. -->
	<target name="compile.dotnet"
		description="Compiles the generated C# files and generate the WSDL for Java.">

		<fail unless="env.DevEnvDir"
			message="The DevEnvDir environment variable is undefined; it must be defined by running %VS110COMNTOOLS%\vsvars32.bat." />

		<exec executable="devenv"
			dir="${src.dir.csharp}/${web.svc.csharp.sln}"
			failonerror="false"
			failifexecutionfails="true"
			resultproperty="compile.csharp.result">

			<arg line="${web.svc.csharp.sln}.sln /rebuild Release /out ${build.dir.dotnet}/devstudio-build.log" />
		</exec>

		<!-- Fail the build if the C# build returns anything other than 0 -->
		<condition property="fail.the.build">
			<not>
				<equals arg1="0" arg2="${compile.csharp.result}" />
			</not>
		</condition>

		<fail if="fail.the.build"
			message="Build result code: ${compile.csharp.result}. See ${build.dir.dotnet}/devstudio-build.log for any errors." />

		<!-- Generate WSDL files from WCF and store them in the webapp directory for JAX-WS -->
		<mkdir dir="${build.dir.dotnet}/wsdl" />

		<exec executable="${src.dir.csharp}/${web.svc.csharp.sln}/${web.svc.csharp.svc.proj}/bin/Release/${web.svc.csharp.svc.proj}"
			failonerror="true"
			vmlauncher="false">

			<arg line="http://localhost:83/${web.svc.webapp.name} ${build.dir.dotnet}/wsdl" />
		</exec>
	</target>


	<!-- Copies the required .NET files into a directory that can be used to create an IIS application. -->
	<target name="deploy.dotnet"
		depends="compile.dotnet"
		description="Copies the required .NET files into a directory that can be used to create an IIS application.">

		<mkdir dir="${deploy.dir.dotnet}" />
		<mkdir dir="${deploy.dir.dotnet}/bin" />

		<copy todir="${deploy.dir.dotnet}" flatten="true" failonerror="false">
			<fileset dir="${src.dir.csharp}/services" includes="**/*.svc, Web.config" />
		</copy>

		<copy todir="${deploy.dir.dotnet}/bin" failonerror="false">
			<fileset dir="${src.dir.csharp}/${web.svc.csharp.sln}/${web.svc.csharp.impl.proj}/bin/Release" includes="*.dll" />
		</copy>
	</target>


	<!-- Copies the generated Java files and generates JAX-WS portable artifacts used in JAX-WS web services. -->
	<target name="compile.java"
		description="Copies the generated Java files and generates JAX-WS portable artifacts used in JAX-WS web services.">

		<mkdir dir="${build.dir.java}/classes" />

		<javac srcdir="${src.dir.java}/services" destdir="${build.dir.java}/classes" optimize="false" debug="true" includeantruntime="false">
			<classpath>
				<path refid="classpath"/>
			</classpath>
		</javac>

		<wsgen sei="com.opentext.livelink.service.${web.svc.namespace}.${web.svc.name}_JAXWS"
			destdir="${build.dir.java}/classes"
			sourcedestdir="${src.dir.java}"
			keep="true">

			<classpath>
				<pathelement location="${build.dir.java}/classes"/>
				<path refid="classpath"/>
				<pathelement location="${src.dir.java}"/>
			</classpath>
		</wsgen>
	</target>


	<!-- Bundles the compiled Java classes into .jar files and creates a .war file that can be deployed in Tomcat. -->
	<target name="deploy.java"
		depends="compile.dotnet, compile.java"
		description="Bundles the compiled Java classes into .jar files and creates a .war file that can be deployed in Tomcat.">

		<delete dir="${build.dir.java}/lib" />
		<delete dir="${deploy.dir.java}" />

		<mkdir dir="${build.dir.java}/lib" />
		<mkdir dir="${deploy.dir.java}" />


		<!-- Create the Java API distribution -->
		<jar destfile="${build.dir.java}/lib/${web.svc.webapp.name}-api-${web.svc.version}.jar">
			<fileset dir="${build.dir.java}/classes">
				<include name="com/opentext/livelink/service/**/*.class" />
				<exclude name="com/opentext/livelink/service/**/*_JAXWS.class" />
				<exclude name="com/opentext/livelink/service/**/jaxws/*.class" />
			</fileset>
			<manifest>
				<section name="com/opentext/livelink/service/">
					<attribute name="Implementation-Title" value="${web.svc.display.name} API" />
					<attribute name="Implementation-Version" value="${web.svc.version}" />
					<attribute name="Implementation-Vendor" value="Open Text Corporation" />
				</section>
			</manifest>
		</jar>

		<!-- Create the JAX-WS distribution -->
		<jar destfile="${build.dir.java}/lib/${web.svc.webapp.name}-jaxws-${web.svc.version}.jar">
			<fileset dir="${build.dir.java}/classes">
				<include name="com/opentext/livelink/service/**/*_JAXWS.class" />
				<include name="com/opentext/livelink/service/**/jaxws/*.class" />
			</fileset>
			<manifest>
				<section name="com/opentext/livelink/service/jaxws/">
					<attribute name="Implementation-Title" value="${web.svc.display.name} - JAX-WS support" />
					<attribute name="Implementation-Version" value="${web.svc.version}" />
					<attribute name="Implementation-Vendor" value="Open Text Corporation" />
				</section>
			</manifest>
		</jar>

		<!-- Create the WAR file -->
		<war destfile="${deploy.dir.java}/${web.svc.webapp.name}.war" webxml="${basedir}/resources/jaxws/web.xml">
			<webinf dir="${src.dir.java}/services/com/opentext/livelink/service">
				<include name="sun-jaxws.xml" />
			</webinf>

			<webinf dir="${build.dir.dotnet}">
				<include name="wsdl/*"/>
			</webinf>

			<lib dir="${build.dir.java}/lib" />
			<lib dir="${basedir}/lib/java" />

			<manifest>
				<section name="WEB-INF">
					<attribute name="Implementation-Title" value="${web.svc.name} Web Application" />
					<attribute name="Implementation-Version" value="${web.svc.version}" />
					<attribute name="Implementation-Vendor" value="Open Text Corporation" />
				</section>
			</manifest>
		</war>
	</target>

</project>
And the referenced build.properties is as follows:
# Source Files
src.dir.java=${basedir}/java_src
src.dir.csharp=${basedir}/cs_src

# Service Specific Items
web.svc.version=1.0.0
web.svc.display.name=HelloWorld Service
web.svc.name=HelloWorld
web.svc.namespace=hello
web.svc.webapp.name=helloworld
web.svc.csharp.sln=${web.svc.name}
web.svc.csharp.impl.proj=${web.svc.name}API
web.svc.csharp.svc.proj=${web.svc.name}Service

# Output Directories
build.dir=${basedir}/build
build.dir.java=${build.dir}/java
build.dir.dotnet=${build.dir}/dotnet

# Deploy Directories
deploy.dir=${build.dir}/webservices
deploy.dir.java=${deploy.dir}/java/webapps
deploy.dir.dotnet=${deploy.dir}/dotnet/helloworld
Open a command prompt and run the ANT build. You should get the following result:
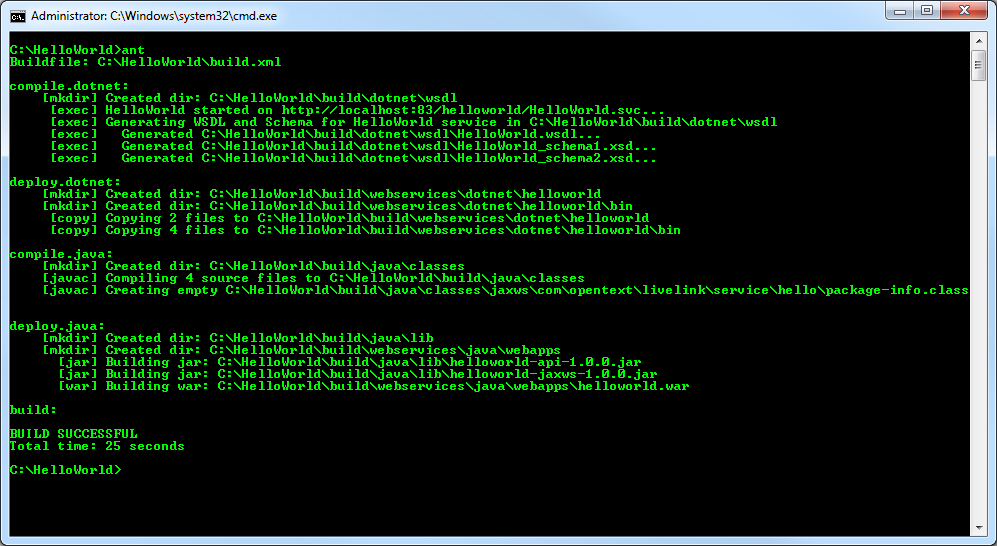
The build\webservices\dotnet\helloworld contains the required files for the .NET version of the service. You can use this directory when creating an application in IIS.
The build\webservices\java\webapps contains the helloworld.war file for the Java version of the service. You can copy this file to the Tomcat webapps directory to deploy the service in Tomcat.
Source Code
- HelloWorld.zip
- build.properties
- build.xml
- HelloWorldService - Program.cs
- HelloWorldTestClient - Program.cs