Downloading Documents (Java)
This tutorial walks you through all the steps needed to start downloading documents from Content Server using the CWS API with Java and Eclipse.
Outline
- Create a New Project
- Create CWS Client Proxies
- Write Your Code
- Run the Program
- Source Code
- References
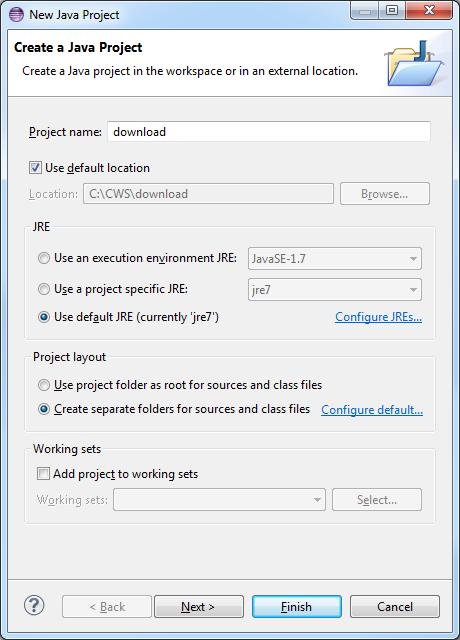
Create a New Project
The first thing we need is a new project in Eclipse to work with.
-
Open Eclipse.
-
Open the File menu and select New → Java Project.
-
Enter a name for the project and then select Finish.
Create CWS Client Proxies
Next, we need create the client proxies for each CWS service we want to use.
-
Open a new command prompt.
-
Use the wsimport command to generate the client proxies for each service. Enter the following commands:
wsimport -keep http://localhost:8080/cws/services/Authentication?wsdlwsimport -keep http://localhost:8080/cws/services/ContentService?wsdlwsimport -keep http://localhost:8080/cws/services/DocumentManagement?wsdl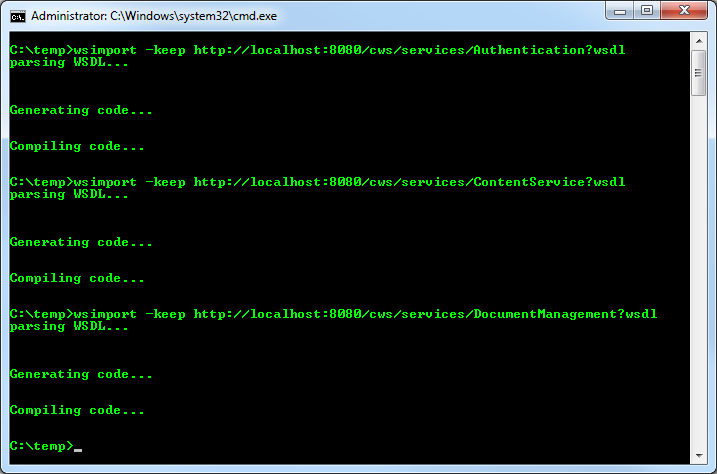
-
Use the jar command to bundle the generated class files into a .jar file. Enter the following command:
jar cvfM cws.jar com/opentext*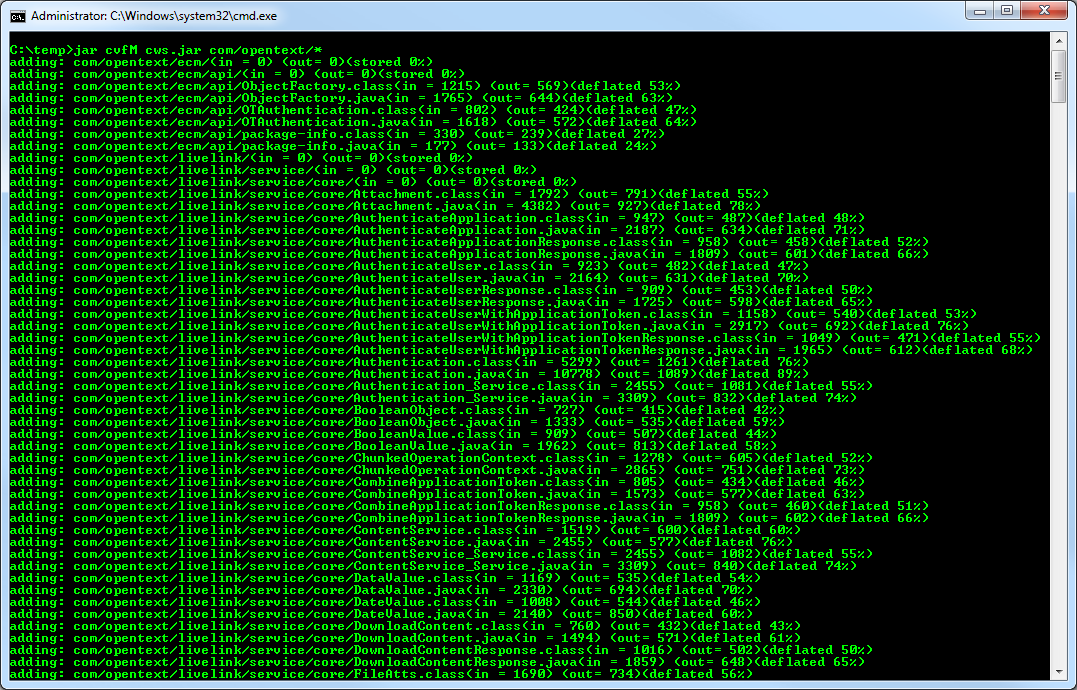
-
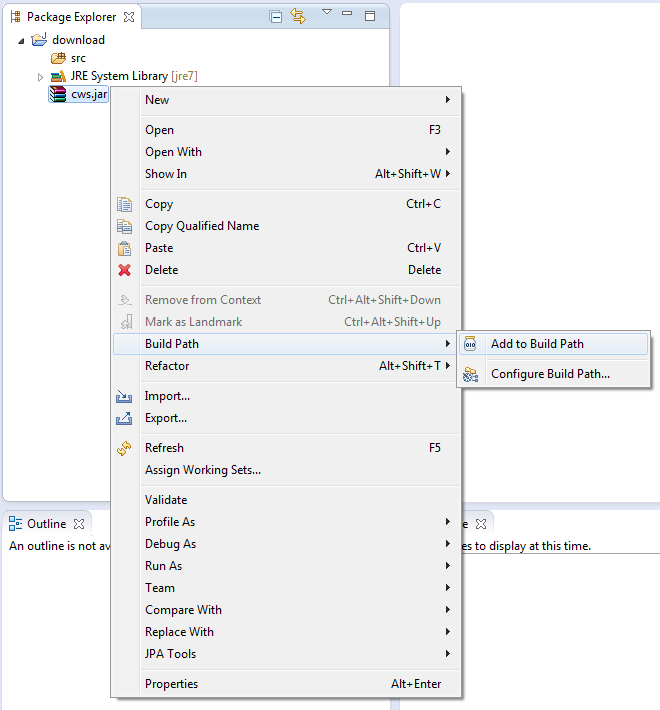
Copy the cws.jar file into your eclipse project and add it to your build path by right clicking the cws.jar file in the Package Explorer and select Build Path → Add to Build Path.
Write Your Code
Now that the CWS services are ready to use we can go ahead and start writing some code. The first thing to do is to authenticate a user. We will use basic Content Server authentication using the CWS Authentication service. You will need to change the username and password to use valid credentials of a user on your system.
// The user's credentials
final String USERNAME = "username";
final String PASSWORD = "password";

// Create the Authentication service client
Authentication_Service authService = new Authentication_Service();
Authentication authClient = authService.getBasicHttpBindingAuthentication();

// Store the authentication token
String authToken = null;

// Call the AuthenticateUser() method to get an authentication token
try
{
	System.out.print("Authenticating User...");
	authToken = authClient.authenticateUser(USERNAME, PASSWORD);
	System.out.println("SUCCESS!\n");
}
catch (SOAPFaultException e)
{
	System.out.println("FAILED!\n");
	System.out.println(e.getFault().getFaultCode() + " : " + e.getMessage());
	return;
}
Next, store the metadata for the download in a method context on the server. You will need to change the documentID to an ID of a document on your system.
// The ID of the document to download
int documentID = 5631;

// Create the DocumentManagement service client
DocumentManagement_Service docManService = new DocumentManagement_Service();
DocumentManagement docManClient = docManService.getBasicHttpBindingDocumentManagement();

// Create the OTAuthentication object and set the authentication token
OTAuthentication otAuth = new OTAuthentication();
otAuth.setAuthenticationToken(authToken);

// We need to manually set the SOAP header to include the authentication token
try
{
	// The namespace of the OTAuthentication object
	final String ECM_API_NAMESPACE = "urn:api.ecm.opentext.com";

	// Create a SOAP header
	SOAPHeader header = MessageFactory.newInstance().createMessage().getSOAPPart().getEnvelope().getHeader();

	// Add the OTAuthentication SOAP header element
	SOAPHeaderElement otAuthElement = header.addHeaderElement(new QName(ECM_API_NAMESPACE, "OTAuthentication"));

	// Add the AuthenticationToken SOAP element
	SOAPElement authTokenElement = otAuthElement.addChildElement(new QName(ECM_API_NAMESPACE, "AuthenticationToken"));
	authTokenElement.addTextNode(otAuth.getAuthenticationToken());

	// Set the SOAP header on the docManClient
	((WSBindingProvider) docManClient).setOutboundHeaders(Headers.create(otAuthElement));
}
catch (SOAPException e)
{
	System.out.println("Failed to set authentication SOAP header!\n");
	System.out.println(e.getMessage());
	return;
}

// Store the context ID for the download
String contextID = null;

// Call the getVersionContentsContext() method to create the context ID
try
{
	System.out.print("Generating context ID...");
	contextID = docManClient.getVersionContentsContext(documentID, 0);
	System.out.println("SUCCESS!\n");
}
catch (SOAPFaultException e)
{
	System.out.println("FAILED!\n");
	System.out.println(e.getFault().getFaultCode() + " : " + e.getMessage());
	return;
}
Finally, download the file using the contextID from before. You can change the FILE_PATH value to download the file to a different location, if needed.
// The local file path to download the document to
String FILE_PATH = "C:/temp/test.pdf";

// Create the ContentService client
// NOTE: ContentService is the only service that requires MTOM support
ContentService_Service contentService = new ContentService_Service();
ContentService contentServiceClient = contentService.getBasicHttpBindingContentService(new MTOMFeature());

// We need to manually set the SOAP headers to include the authentication token and context ID
try
{
	// Namespaces for the SOAP headers
	final String ECM_API_NAMESPACE = "urn:api.ecm.opentext.com";
	final String CORE_NAMESPACE = "urn:Core.service.livelink.opentext.com";

	// Create a SOAP header
	SOAPHeader header = MessageFactory.newInstance().createMessage().getSOAPPart().getEnvelope().getHeader();

	// Add the OTAuthentication SOAP header element
	SOAPHeaderElement otAuthElement = header.addHeaderElement(new QName(ECM_API_NAMESPACE, "OTAuthentication"));

	// Add the AuthenticationToken
	SOAPElement authTokenElement = otAuthElement.addChildElement(new QName(ECM_API_NAMESPACE, "AuthenticationToken"));
	authTokenElement.addTextNode(otAuth.getAuthenticationToken());

	// Add the ContextID SOAP header element
	SOAPHeaderElement contextIDElement = header.addHeaderElement(new QName(CORE_NAMESPACE, "contextID"));
	contextIDElement.addTextNode(contextID);

	// Set the headers on the binding provider
	List<Header> headers = new ArrayList<Header>();
	headers.add(Headers.create(otAuthElement));
	headers.add(Headers.create(contextIDElement));

	((WSBindingProvider) contentServiceClient).setOutboundHeaders(headers);
}
catch (SOAPException e)
{
	System.out.println("Failed to set SOAP headers!\n");
	System.out.println(e.getMessage());
	return;
}

// Create a StreamingDataHandler to download the file with
StreamingDataHandler downloadStream = null;

// Call the downloadContent() method to download the file
try
{
	System.out.print("Downloading file...");
	downloadStream = (StreamingDataHandler) contentServiceClient.downloadContent(contextID);
}
catch (SOAPFaultException e)
{
	System.out.println("FAILED!\n");
	System.out.println(e.getFault().getFaultCode() + " : " + e.getMessage());
	return;
}

// Stream the download to the local file path
try
{
	File file = new File(FILE_PATH);
	downloadStream.moveTo(file);
	System.out.println("SUCCESS!\n");
	System.out.println("Downloaded " + file.length() + " bytes to " + FILE_PATH + ".\n");
}
catch (Exception e)
{
	System.out.println("Failed to download file!\n");
	System.out.println(e.getMessage());
}
finally
{
	// Always close the streams
	try
	{
		downloadStream.close();
	}
	catch (IOException e)
	{
		System.out.println("Failed to close the download stream!\n");
		System.out.println(e.getMessage());
	}
}
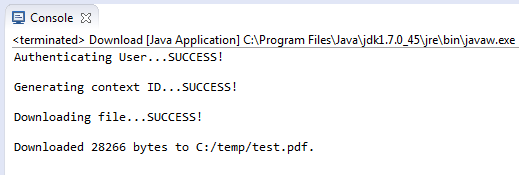
Run the Program
If everything is setup correctly you should be able to successfully run the program.
-
Open the Run menu and select Run (Ctrl + F11).